My apologies for the lateness of this post but I have been having issues with Internet Explorer all day. I can't upload pictures of my cards using Microsoft Edge and today IE has just not wanted to play ball. Anyway, it seems to be working at the moment, so I'll get on with uploading this as quickly as possible.
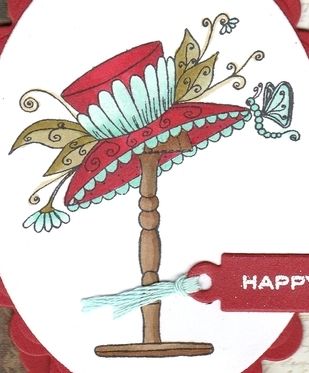
This is a card that I made, finally using the beautiful set of stamps by Katy Sue Designs that I bought at the Newbury Artstamps Show. Yet another of those 'must have' purchases that have been sitting in my stash unused.
I decided to use the Prima Madeline paper pad as I really love the colours and they matched the guide illustration on the packaging.
The
hat and stand image, from the Katy Sue Designs Gerbera stamp set, was stamped using
Memento Tuxedo Black dye ink and coloured using Copic markers:
Copics:
Hat:
R27, R37, R39, BG10, BG11, BG32;
Flowers:
BG10, BG11, BG32;
Leaves/Stems:
G00, YG91, YG95;
Fronds:
YG91;
Butterfly:
BG11, BG32;
Hatstand:
E43, E44, E57;
The
image was diecut using a Classic Oval Nestabilities die and matted on
to a Scalloped Classic oval diecut from red cardstock.
The
cardblank was covered using the border paper and the cream script
papers from the Prima Madeline paper pad, and the join was covered
with a strip of card diecut using the Solid Bracket die from MFT
Die-Namics.
The
image panel was then added in the centre of the cardblank.
The
'Happy Birthday' sentiment, from the Personal Impressions Paula
Pascual Mix & Match stamp set, was stamped using Emboss clear
embossing ink and white heat embossed using Stampendous Detail White
Opaque embossing powder. This was then diecut using a tag die from
the Sizzix Tags, Sentiments Framelits die set. The tag was threaded
with aqua embroidery thread and added over the image panel.


