Pages

WELCOME

This blog was created to act as a record of the cards and other projects that I have made. It is for both my own reference and to help inspire anyone who wants to take a look.

I'd love it if you'd leave me a comment so that I know what you think of my projects and that you've been to visit!

Anyone can comment, even those who don't have a blog. (Just look for the word 'Comments' under the three little pictures at the end of each post). Readers without a blog can add an anonymous comment, but please leave your name (and docrafts username if applicable) so I know who you are!

Slideshows of all the cards I've uploaded to my blog can be found at the bottom of the page.


PEOPLE WHO FOLLOW MY BLOG

Saturday 30 July 2011

Blue, Rust and Olive Paper Artsy Houses

This is the first time I've used this stamp set. I know - it's terrible as I've had it a while now and only got around to mounting it up yesterday.


This is the card I have made for my father-in-law. I figured he'd had enough cutesy character cards of late and decided I'd dig these stamps out. I've loved them for ages and have seen some lovely cards using them.

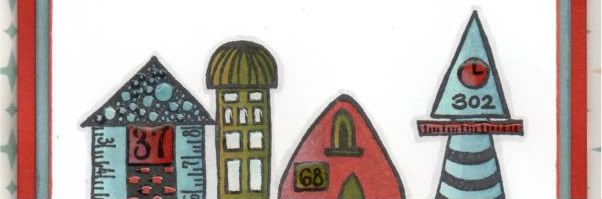
The line of houses image, from the Paper Artsy Bricks and Mortar 2 stamp set, was stamped using Memento Tuxedo Black dye ink and coloured with the Copic sketch markers:
  • Houses 1 & 4: B41, B45, B93, BG11, N1, E04, E07, E09
  • House 2: G99, YG17, YG95, BG11, B41, B45, B93
  • House 3: E04, E07, E09, G99, YG17, YG95
  • Windows: BG10
  • Outline/Shadow: N1
Houses 1 and 4 took some adjusting as I didn't really have a colour to match the paper so I tried blending with the grey and the blue/green to try and get as close a match as I could. I think it worked.


The image was then matted onto blue and rust paper.

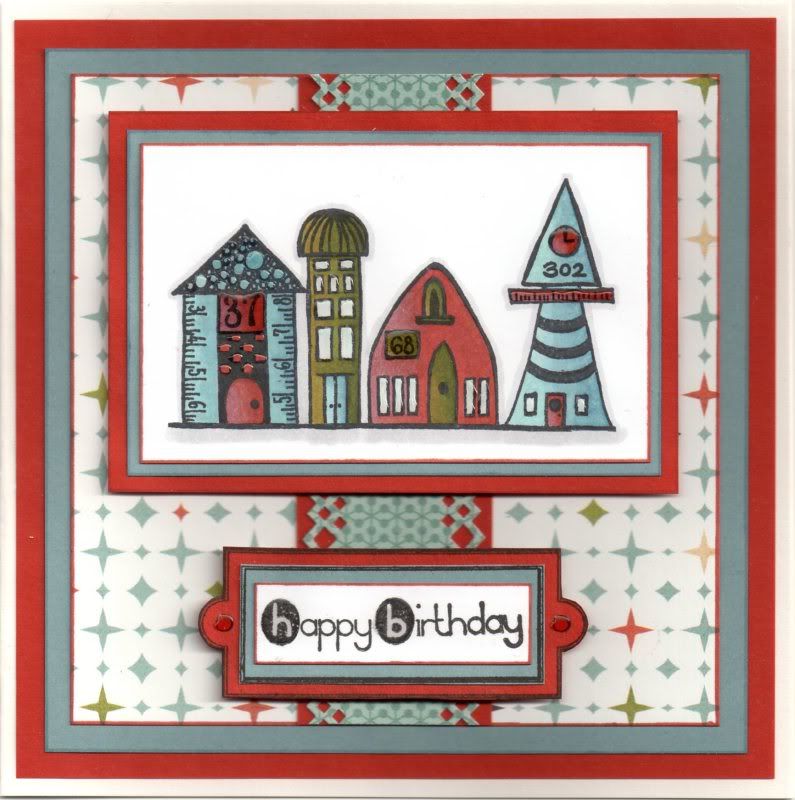
A strip of the Light-Hearted paper from the Basic Grey Offbeat paper pad was punched along both edges using the XCut Diamonds border punch and matted onto the rust paper. This was then matted onto a panel of the Alternative paper from the same paper pad, which in turn was matted onto the blue and rust papers.

The image panel was then matted towards the top of the panel.


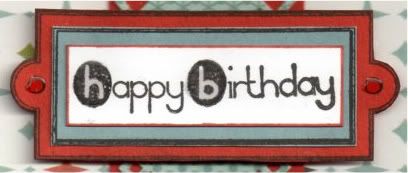
To create the sentiment panel, the rectangular bookplate image from the Stamps Away Bookplates, Photo Corners and Anchors stamp set was stamped onto the rust and blue papers using Versafine Onyx Black archival pigment ink and layered up. The sentiment, from the Dovecraft Make A Wish mini stamp set, was then stamped onto the white card using the Onyx Black ink and matted on top.

The sentiment was then added below the image panel.

Highlights were then added to the image and the sentiment panel with Ranger Glossy Accents.


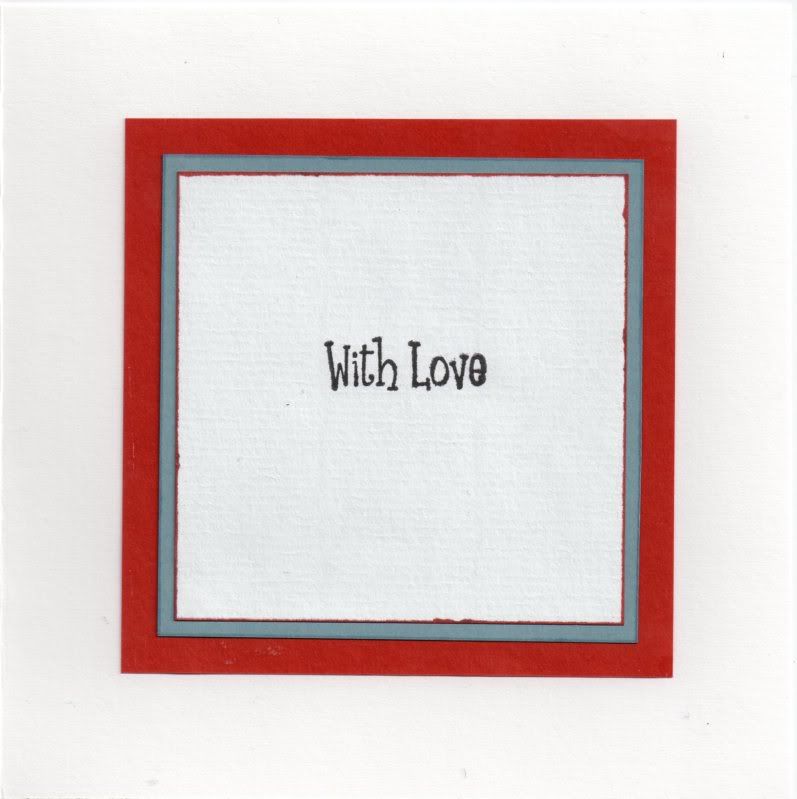
The inside was also decorated using the blue and rust papers, and the sentiment, from the Papermania Clare Curd Sentiments stamp set stamped with the Onyx Black ink.

Here are the blog challenges I am entering this card into:

Friday 29 July 2011

My Card Was Featured As A Super Sundae

I have just seen that I have been selected as a Super Sundae over on the Birthday Sundaes blog challenge.


Birthday Sundaes
 
My Blue and Brown CAS Tea Collage card was entered into their Anything Goes challenge.


You can see my original post for this card here.

Wednesday 27 July 2011

Red and Blue Butterfly Landscape

This was a really quick and simple card to make - something I really need at the moment to try and get on top of the list of cards I need to make.

The die is one that I bought at the Newbury Artstamps Show at the start of July - and it was reduced in price so a bit of a bargain.

I started by inking the edges of a panel of the light blue Moroccan Tile paper from the K&Co The Best of K&Co Too paper pad using ColorBox Maroon fluid chalk ink and then attached it to the bottom of a side fold A6 card. A length of cream grosgrain ribbon was then added across the join.


Using my new Marianne Creatables Butterfly 2 die, a butterfly was die cut from red card and added in the top left corner, adhering only the body of the butterfly to the card so the wings are fluttering.

The body of the butterfly was then embellished with large grey and aqua pearls from the Create and Craft carousel.


The sentiment, from the HOTP Sentiments stamp set was added in the bottom right corner using Versafine Crimson Red archival pigment ink.

Here are the challenges I'm entering this card into:

Sunday 24 July 2011

Black and Teal Fleur de Lis Script Anniversary

This card was inspired by a card I saw made by the lovely LizzieS. I told her I'd be borrowing the idea!!!


I started by colouring a panel of white card with Adirondack Stream dye ink using a shaving brush and overstamped using the same ink with the Prima Notary stamp, using second-generation ink.

The Fleur de Lis mini stamp from Inkadinkado was stamped over the top using Versafine Onyx Black archival pigment ink, as was the Stamps Away Happy Anniversary stamp.


The image panel was then matted onto black card.

A strip of teal floral circle paper, from the Papermania Temptations Big One paper pad, was matted onto the black card and across the card blank and the image panel matted over the top.

Three large teal pearls (from the Create and Craft carousel) were added in the top right corner.


I also decorated the inside of the card using the Warm Wishes stamp from the Hot Off The Press Sentiments stamp set and the Onyx Black ink.

Here are the challenges I am entering this card into:

Thursday 21 July 2011

Black and White Ornament Sympathy Card For Liz G's Family

This was a difficult card to make. Just last week I discovered that a lady who is very active on the docrafts forum, Liz G, sadly passed away suddenly. Her lovely daughter, Pixie-Lou, also a forum member, kindly took the time  to let us know despite her obvious grief.


So, having reclaimed my craft room after the in-laws had visited, I got my stash out and had a think. I went with a clean and simple idea.

I didn't have a suitable sentiment stamp so created something in Word using Century Gothic and Lauren Script fonts and cut it into a panel.


The ornament image, from the Papermania Chatsworth Furnishings stamp set, was stamped centrally using Versafine Onyx Black archival pigment ink. The corners of the panel were punched with the Woodware Inverted Corner Rounder punch and matted onto black card.


Ivory pearls, from the Hobby House Wedding Day set of self-adhesive pearls were added in the corners and on the ornament image.

A strip of the black card was added across a tent fold card and the image panel added over it.


I also decorated the inside of the card using the Thinking Of You stamp from the Hot Off The Press Sentiments stamp set and the Onyx Black ink.

Wednesday 20 July 2011

I Was Picked As Card Of The Month On My Grafico

I thought that I'd already posted this but seem I hadn't.

I was picked as Card Of The Month over on My Grafico.


You can see my original post for this card here.

Sunday 17 July 2011

Blue and Brown CAS Tea Collage

Well, having spent more than I care to admit to at the Newbury Artstamps Show last weekend, I decided to use one of my new stamp sets to create my mum's birthday card.

This card was based quite heavily on a card I saw at the show on the Snazzy Stamping stall using this stamp set. It was what convinced me to buy it!!!


It''s from a new stamp company to me - Chapel Road Art Stamps. It's a Canadian company and they have some lovely collage style stamps and background stamps.

So, to create the card, the twig image, from the Tea Collage stamp set was stamped directly onto the card blank using Memento Rich Cocoa dye ink.

Using the same inkpad, the Tea Collage image from the same stamp set, was stamped onto the same white cardstock as the card blank, trimmed and distressed around the edges using Tim Holtz Tumbled Glass distress inks, applied with a shaving brush. This was then matted onto dark brown linen cardstock and matted onto the card blank.


A length of the light blue grosgrain ribbon from Dovecraft was cut and fishtails added to each end. This was added across the bottom of the card.

The sentiment was computer generated using Calibri and Callie Hand fonts and distressed with the Tumbled Glass ink. This was then matted onto the brown cardstock and adhered over the ribbon.


The inside was also decorated using the twig image, stamped with second-generation Rich Cocoa ink. The sentiment, from the Papermania Mix and Match Scrolls and Sentiments stamp set, was then stamped in the centre also using the Rich Cocoa ink. The panel was then distressed with the Tumbled Glass ink with a shaving brush.

Here are the challenges I am entering this card into:

Tuesday 5 July 2011

I Am In The Spotlight Over On Sweet Stampin'

I've just spotted that I was In The Spotlight over on the Sweet Stampin' blog challenge.


Photobucket


My Blue and Grey Paper Artsy Castle was entered into their 'Something Old, Something New' Challenge.


You can see my original post for this card over on my blog here.

Monday 4 July 2011

Lilac, Blue and Cream Scribble Daisies Anniversary

Here is the anniversary card that I made for my matey Teresa and her hubby Ken. I wanted to go with something a bit more summery so opted for the lilac colour tones.


Three panels were cut from white card and stamped with the Scribble Daisy stamp from the Papermania Hampstead Collection Sketch Flower stamp set using Brilliance Pearlescent Purple pigment ink. The panels were then matted onto blue paper and scalloped lilac squares die cut using a Nestabilities die.

A strip of the mottled blue paper from the HOTP Floral Ultimate Cardmaker's Creative Pack was matted onto the lilac card and across a panel of the lilac, blue and cream weave patterned paper from the same paper pad. This was then punched with the Martha Stewart Scallop Dot border punch and matted onto the blue paper and lilac card.

Detail of image and sentiment
The 'Togetherness' sentiment, from the Making Memories Express It stamp set, was stamped using the Pearlescent Purple ink and matted onto the blue and lilac. Once the card was assembled, the lilac pearls from the Kort and Godt pastels set were added between the image panels. It seemed only fair that I used the pearls on Teresa's card as she very kindly split a couple of the sets with me!!

Here are the blog challenges I am entering this card into:

Friday 1 July 2011

I Won The Craft Garden Blog Challenge

I have managed to be the winner over on The Craft Garden Blog Challenge.


You can see my original post for this card over on my blog here.

ETA: I have won some handmade flowers, so can't wait for them to arrive!
Blog Widget by LinkWithin