Pages

WELCOME

This blog was created to act as a record of the cards and other projects that I have made. It is for both my own reference and to help inspire anyone who wants to take a look.

I'd love it if you'd leave me a comment so that I know what you think of my projects and that you've been to visit!

Anyone can comment, even those who don't have a blog. (Just look for the word 'Comments' under the three little pictures at the end of each post). Readers without a blog can add an anonymous comment, but please leave your name (and docrafts username if applicable) so I know who you are!

Slideshows of all the cards I've uploaded to my blog can be found at the bottom of the page.


PEOPLE WHO FOLLOW MY BLOG

Wednesday 21 September 2011

I Made Top 3 At Digistamps4Joy

I've just seen that I made Top 3 over at the Digistamps4Joy blog challenge.


My Red and Cream Tiddly Inks Mushroom New Home card was chosen as Top 3 in their Colours Of Fall challenge.


You can see the original post for this card here.

Brown and Blue Floral Chandelier Tags Anniversary

This is a second version of the anniversary card I made recently using the Chandelier stamp that came free with the July 2011 issue of Craft Stamper Magazine.


I went for more muted tones with this version, using one of my favourite colour combinations of blue and brown.

The Chandelier image was stamped using Adirondack Stream dye ink and matted onto the blue diamonds paper from the Prima Madeline paper pad.


The card blank was completely covered with the Brown Script Floral paper from the same paper pad and the image panel added to the right.

A strip of the Alphabet paper was added to a strip of the Multi Border paper and this was then added over the image panel. Faux stitching was then added over the joins of the paper pieces using the Zigzag Stitch stamp from the HOTP Stitches stamp set and ColorBox Chestnut Roan Fluid Chalk ink.

Two mini tags were coloured around the edges using the Chestnut Roan ink and letters were stamped using the Stream ink and a Studio G mini alphabet stamp set. The tags were attached to some teal embroidery thread and added to the card and a brown Card Candi from Craftwork Cards was added over the ends of the threads.


Highlights were added to the Chandelier image using Glossy Accents and DecoArt Crystal Glamour dust.
All papers were distressed with the Chestnut Roan ink.

The inside of the card was also decorated using a photo corner stamp from the Stamps Away Bookplates, Corners and Anchors stamp set, stamped onto the blue diamonds paper used on the front of the card using the Stream ink and cut out


Slits were cut into the photo corners and the writing paper inserted into the corners, and a strip of the Brown Script Floral paper used on the front of the card was added across the paper and the sentiment, from Elzybells, was stamped using the Stream ink.

Here are the blog challenges I am entering this card into:

Friday 16 September 2011

Citrus Lily With Moving Sentiment - Lia Stampz Challenge #3

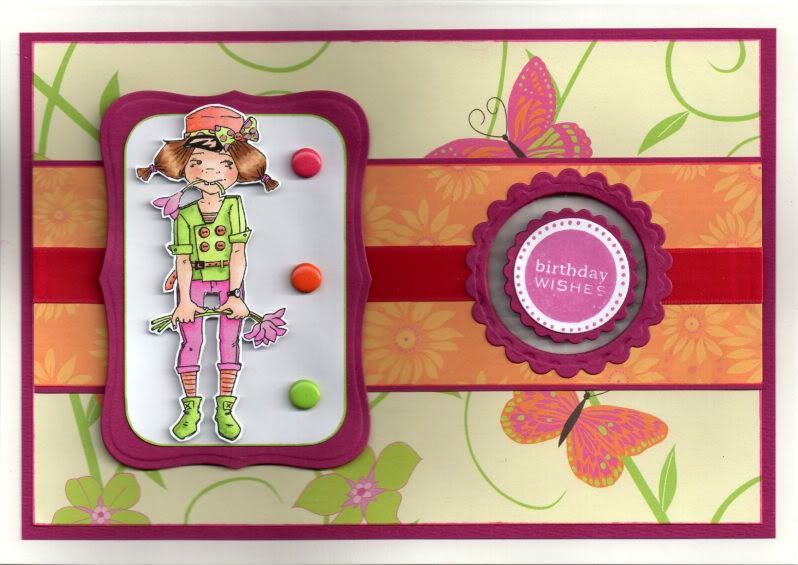
Well, here goes!! Here is my very first DT card! I was very kindly asked by the ladies at Lia Stampz to join their DT team. The images designed by Lia are pretty quirky and I look forward to using them! You can find them here


Lia Stampz, digital stamps


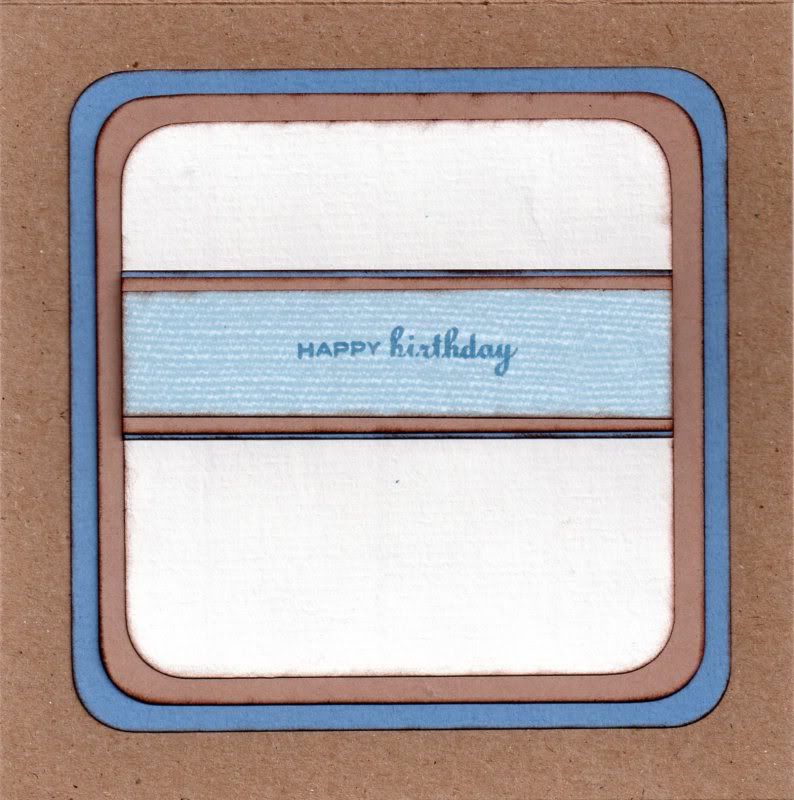
This card is made for Challenge #3 over at Lia Stampz which was to include a moving element. This took me completely out of my comfort zone I can tell you and took quite a bit of thought and research. In the end, I decided on a card with a moving sentiment. I followed the tutorial over on the Splitcoaststampers site, and you can see the tutorial here.


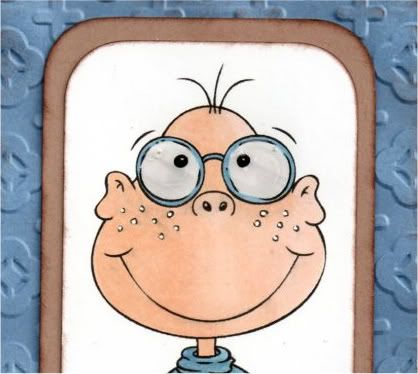
I've made this card for my sister as I think she'll appreciate the quirky nature of the image. She lives in (sunny) Spain and is enjoying much warmer weather than us here in the UK.

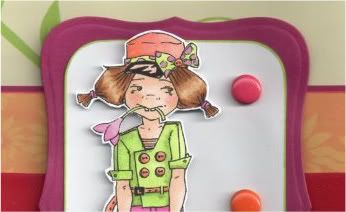
The image, a digi from Lia Stampz called Lily, was coloured using Copic sketch markers:
  • Skin: E00, E11, E21, R02
  • Hat/Top/Socks: YR00, YR02, YR04
  • Bow: RV04, RV11, YG11, YG13
  • Hair: E31, E33, E35, E37
  • Jacket/Boots: YG11, YG13, YG17
  • Flowers/Trousers: RV04, RV06, RV09, RV11
  • Stems: YG13, YG17
  • Hair Ties: RV06, RV09
  • Eyes: YG13, E35
  • Belt/Buttons: YR02, YR04
  • Watch Glass: C0
The image was then cut out.

The image was then matted onto a panel of white card and a panel of hot pink card die cut with a Nestabilities Labels 8 die. Three brads, from the HOTP Ultimate Cardmaker's Creative Pack embellishment kit were then added to the image panel.


An aperture was cut into the card blank using a Classic Circle Nestabilities die. Unfortunately, I don't have a Grand Caliber so I had to cut my aperture through the front and back of the card blank. I tried to cut through just the front, with the back of the card folded over the cutting plate, but it got too damaged to be used so I just cut through the front and back!

A strip of the orange daisies paper from the Dovecraft Kate Knight Wild Blossom paper pack was matted onto the hot pink card and a circle die cut from it the same size as the aperture in the card, making sure it fitted over the aperture. Hot pink satin ribbon was then wrapped around the panel either side of the aperture.

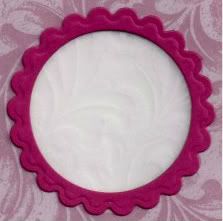
A length of Invisithread was then added across the aperture. Two circles were then die cut from white card and the sentiments from the Personal Impressions Paula Pascual Mixed Sentiments stamp set were stamped in the centre of them using Memento Lilac Posies dye ink. There were matted onto Classic Scalloped circles of pink card and adhered to the Invisithread.


A panel of the light green butterfly paper from the same paper pack was matted onto the pink card and the location of the aperture was marked and then die cut with the circle die. The two patterned paper layers were then matted up and onto the card blank.

A scalloped frame was then created using Nestabilities dies from the pink card and added around the aperture.


The image panel was then added to the left of the card blank.


The inside of the card was also decorated.

Having cut a whacking great hole in the back of my card, I decided to make a feature of it and so decided to use vellum.

A panel of the pink card and a panel of the leaves vellum from the Papermania Exquisite Vellum Collection pack were die cut to fit over the aperture.

A small panel of the vellum was then added to the reverse of the pink panel and a scalloped frame was cut from the pink card to go around the aperture.


A panel of the orange daisies paper was matted onto the vellum with a panel of writing paper. This was then stamped with the sentiment from the Mixed Sentiments stamp set using the Lilac Posies ink.

So, having seen my card, please pop over to the Lia Stampz blog and have a look at all the different types of 'moving element' cards they've come up with.

Here are the blog challenges I'd like to enter this card into:

Wednesday 14 September 2011

Red and Cream Tiddly Inks Mushroom New Home

I needed to make a New Home card for my friend who has just moved back to Germany. Of course, having made the card, I learnt that there were issues with the new house and so they weren't actually moving into it. But, thankfully all the issues have now been resolved and they can now move out of the hotel and into their new home.


I decided that I would make the New Home card using this cute digi image.

The Mushroom House digi image, from Tiddly Inks, was coloured with Copic Sketch markers:
  • Mushroom Roof: E04, E07, E09, R02, R37, R39
  • Mushroom Base: Y00, Y02, Y11, E40, E41, E43
  • Door: E33, E35, E37
  • Window Frame: E35
  • Window: BG10
  • Grass/Leaves/Trees: YG13, YG95
  • Flowers/Sign/Door Mat: R02
  • Pot: E07
  • Shadow: E35, E43
  • Letters: E40

The corners of the image panel were then punched with the large XCut corner rounder. This was then matted onto a panel of cream card and a panel of deep red card die cut using a Nestabilities Labels 1 die.

A panel of the Cream Floral Script paper from the Prima Botanical paper pad was matted onto the red card, both punched with the corner punch.

The sentiment panel was created by stamping the curly frame image from the Papermania Tweet stamp set using Versafine Onyx Black archival pigment ink and the sentiment from the Papermania Mix and Match Scrolls and Sentiments stamp was stamped in the centre using the same ink. The frame was cut out and matted onto the cream and red cardstocks.


The flowers on the main image were then highlighted with Craft Planet Iridescent Sparkle glitter glue.

The frame of the sentiment panel was traced around using the clear Sakura Stardust pen.


The inside of the card was also decorated, using my much-neglected Sizzix Sizzlits Latches die. The rivets of the latches were coloured using the 110 Copic sketch marker and traced over with the clear Sakura Stardust pen.

Here are the blog challenges I am entering this card into:

I Am A Winner Over At I Did It Creations

I have just seen that I am a winner over on the I Did It Creations blog challenge.


You can see the original post for this card here.

Saturday 10 September 2011

I Was Chosen As A VIP Top 3 Over On PartyTime Tuesdays Blog Challenge

I've just found out that my card has been selected as a VIP Top 3 over at PartyTime Tuesdays Blog Challenge.


My Light Blue and Brown Prairie Fairy Lewis card was chosen in their Anything Goes challenge.


You can see the original post for this card here.

Thursday 8 September 2011

Pink and Brown Reverse Masked Heart Aperture Anniversary

Well, I don't know about you but I've had enough of masculine cards so here's a more feminine anniversary card for you!

This card was inspired by a card I saw over on the Splitcoaststampers gallery by MarieMc and you can see the card that she made here and here on her blog.

I needed to make a couple of anniversary cards and thought this idea would work really well. I'm thinking I might try it with my butterfly die too.


The heart, from the Marianne Creatables set of three heart dies (LR0159), was cut from the card front. A mask was also cut and affixed to the inside of the card behind the aperture so that it lined up.

Colour was added through the mask using Tim Holtz Tattered Rose distress ink and then overstamped using the Tattered Rose and Frayed Burlap distress inks using the flourish stamp from the Personal Impressions Paula Pascual Mix and Match Sentiments stamp set.


The sentiment, from the Woodware Jane's Script sentiment stamp set was then stamped on the inside using the Frayed Burlap ink.

Using the Stampin' Up Mat Pack piercing template, holes were then pierced around the heart aperture.


A panel of pink paper was punched using the Eyelet Lace border punch from Martha Stewart, and a strip of the pink floral stripe paper from the Papermania Regency paper pad was matted onto it. A length of pink woven ribbon was then knotted around it and the panel added to the card blank.

The sentiment, also from the Jane's Script Sentiment stamp set was then stamped at the bottom of the card blank using the Frayed Burlap ink.

 
As my personalized 'Handmade By' stamp is a circle and I felt sure you would be able to see it through the card blank if I stamped it on the reverse of the card, I decided to die cut a heart from the pink paper using another of the heart dies in the Marianne Creatables die set. The embossed design was highlighted with the Frayed Burlap ink, and 'Handmade By' was stamped on it using a stamp from the Aspects Of Design Botanical stamp set from The Stampman. It was then added on the reverse of the card behind the inked heart on the inside of the card.


Here are the blog challenges I am entering this card into:

i Made Top 3 At The C.R.A.F.T. Blog Challenge

I've just seen that I made Top 3 over on the C.R.A.F.T. blog challenge.


Here is the sketch:


And here is my card:


You can see the original post for this card here.

Monday 5 September 2011

Red and Brown Explore Invoke Arts Tags

Well, here is the first of the masculine 40th birthday cards that I need to make. Got to get my thinking cap on for the second one now!


A piece of white card was coloured using Tim Holtz Fired Brick, Aged Mahogany and Frayed Burlap distress inks using the shaving brushes.

This was then overstamped with the Explore tag from the Invoke Arts Travel Tags stamp set and the 'Happy Birthday' sentiment stamp from the See D's Celebration Messages stamp set. All were stamped using Memento Rich Cocoa Dye ink.

Using a damp paint brush and a piece of tissue (OK, toilet roll, but I couldn't be bothered going downstairs to get a tissue!!), some of the colour was removed from the face image on the tag. Areas of the compass were then lightly coloured using the Angel Green Mica Pigment from Stamps Away. Unfortunately that doesn't show up on the scan.

The tags were then cut out by hand and matted onto cream card and dark brown card. Holes were punched in the top of each tag using the Big Bite and small cream eyelets from Papermania were set in the holes. Each hole was then threaded with cream embroidery thread.


The sentiment was also matted onto cream and dark brown cardstock and large cream brads from Papermania were added either side of the sentiment, with a length of cream embroidery thread threaded through the legs of the brads.


A strip of the red/brown paper from the DCWV Old World mat stack was embossed using the Moroccan Screen embossing folder from Cuttlebug and Frayed Burlap ink was added to highlight the embossing using Cut 'n' Dry foam.

This was then matted onto cream and dark brown card and then matted across a panel of the dark brown flourish paper from the same paper pad.

Once matted onto the dark brown cardstock, the panel was then paper pierced all the way around using the Stampin' Up Mat Stack piercing template.


The tags were adhered onto the card in the centre over the embossed strip and the sentiment was added beneath, wrapping the lengths of embroidery thread behind the panel before adhering to the card front.

The inside of the card was also decorated, using another strip of the embossed cardstock. The sentiment was stamped using the Rich Cocoa ink and stamps from the See D's Lower Case Script stamp set ('4', '0' and 'th') and the HOTP Sentiments stamp set (Happy and Birthday).


Here are the blog challenges I am entering this card into:

Sunday 4 September 2011

I Made Top 3 Over At 2 Sisters

I have just spotted that I have made Top 3 over at 2 Sisters blog challenge

2 Sisters Top 3 Badge


You can see the original post for this card here.

Friday 2 September 2011

Light Blue and Brown Prairie Fairy Lewis

This is one of the many masculine cards I need to make at the moment. I decided to use the amusing digi image of Lewis from the Prairie Fairy.


The image was coloured with Copic markers:
  • Skin: E00, E11, E21
  • Glasses: B45
  • Glass: N1
  • Jumper: B41, B45, B93
  • Shorts/Boots: E41, E43, E44
  • Shadow: W1, W3
Highlights were then added to the cheeks on the image using the Papermania Snow White gel pen.

 The image was then trimmed and the corners rounded with the XCut large corner rounder punch. This was then matted onto a panel die cut using a Mega Curved Rectangle die from Nestabilities that was embossed with the Cuttlebug Moroccan Screen embossing folder.


A strip of the light blue and brown stripe paper from the HOTP Ultimate Cardmaker's Creative Pack was matted onto beige card and a strip of blue paper punched with the XCut Diamonds border punch.

This was added across a panel of the light blue paper from the same paper pad.

A couple of lengths of mid-blue hemp cord were added across the stripe panel and the panel was then matted up onto the card blank.

The sentiment, from the Personal Impressions Paula Pascual Mixed Sentiments stamp set was stamped using Tim Holtz Faded Jeans distress ink and die cut using a classic circle Nestabilities die and matted onto circles of the beige card and blue paper.


A small beige eyelet was added to the tag and threaded with the blue hemp cord and tied to the cord across the card.

I also decorated the inside of the card, using the same papers as the front of the card and the sentiment, from the Personal Impressions Paula Pascual Mix and Match Sentiments stamp set, was stamped across the patterned paper using the Faded Jeans ink.


Here are the blog challenges I am entering this card into:

Monday 29 August 2011

Red Yellow and Blue Superduper Boy Aged Four

I really enjoyed making this one!! It's for a friend's little boy. We went to stay with them down in Devon a few weeks back and he was constantly dressing up in super-hero costumes so I knew straight away which image I was going to use on his card.


The Superduper Boy image from Mo's Digital Pencil was coloured using Copic Sketch markers:
  • Cape: R20, R24, R27, R29, E09, Y00, Y21, Y26
  • Shorts: R24, R27, R29, Y21, Y26
  • Gloves/Mask: Y21, Y26
  • S & Panel: R24, R27, R29, Y21
  • Boots: R20, R24, R27, R29
  • Body Suit: B32, B34, B37
  • Hair: E43, E51, E57
  • Skin: E00, E21, E51
The image was then cut out.

A strip of the dark blue stars and banners paper from the HOTP Ultimate Cardmaker's Creative Pack was matted onto dark cream card and a panel of red card embossed with the Cuttlebug Herringbone embossing folder.


Lengths of yellow hemp cord were wrapped around the panel to form a cross and the panel was adhered to the card blank.

A star was die cut from the cream card using the Sizzix Sizzlit Hearts, Stars and Tags die and the number 4, die cut from red card using the Ellison Curlie Girlie alphabet set, was adhered in the centre of the star. A hole was punched in the top of the star using the Big Bite and was then threaded with more of the hemp cord and tied to the cord across the card.


Three soft white Card Candi from Craftwork Cards were coloured yellow with a Copic marker:
  • Card Candi: Y21
These were then attached in the top right corner of the patterned paper.

Here are the blog challenges I am entering this card into:

Sunday 28 August 2011

I Am A Winner Over On Paper Creator's Crafts

I've just found out that I am a winner over on the Paper Creator's Crafts Blog Challenge.


My Red and Aqua Tilda with Hawaiian Flower card was picked as the winner of the Red and Blue challenge.


You can see the original post for this card here.

Friday 26 August 2011

I Am A Winner Over On The Stamp Something Blog Challenge

I have just seen that I am a winner over on the Stamp Something blog challenge.


My Burgundy Floral Thank You card was chosen as the winner of their Thank You Something challenge.


You can see the original post for this card here.

I Am A Winner Over On The Rainbow Lady's Blog Challenge

I have just learnt that I am a winner over on The Rainbow Lady's Blog Challenge.

My Burgundy Floral Thank You card was chosen as a winner in their #166 - Song Of Choice challenge. I chose Dido's Thank You!


You can see my original post for this card here.
Blog Widget by LinkWithin