


I'm sure some of you are aware that I've been talking about treating myself to a set of Copics for the best part of twelve months now. Well, I finally clicked on the 'Confirm Order' button on Tuesday (with much heart pounding and hyperventilating - I don't cope well spending that much money!)
Anyway, I've got a lovely set of 72 Sketch markers (set B) winging their way here, so with a bit of luck I'll actually be able to use them (effectively!)
I've spent the last couple of days watching various Copic Tutorials on YouTube, mostly by a very talented lady who goes by SuzanneJDean. (She also has an amazing blog here). Now of course she uses a different technique to that shown to me by the equally talented Alex, so I'm sure it will take a bit of practice to see which technique works for me.
Now, originally I was going to order my Copics directly from Japan, as they were quite a lot cheaper over there. But, I figured with my luck, I'd get hit by customs so chickened out! I actually bought them from Amazon. Make sure you do your homework though because there's a huge difference in price for the same set of pens depending on where you look online!!
I've managed to print off the Copic Colour Chart in anticipation of my pens arriving. Unfortunately, I don't think they'll be here until next week!! BOO!! :-(
Well, better go and stock up on Memento ink. If anyone can think of anything else I need to 'invest' in, please let me know! (Other than sets A, C and D!)
Friday, 29 January 2010
Monday, 25 January 2010
Lilac and Purple Forever Friends And Daisy
Here is another of my cards that I made back in December and this one was made for my cousin's little girl. I had to make it in quite a hurry due to being so behind with my Christmas cards so I decided to use some of the lovely Forever Friends Elements stickers.
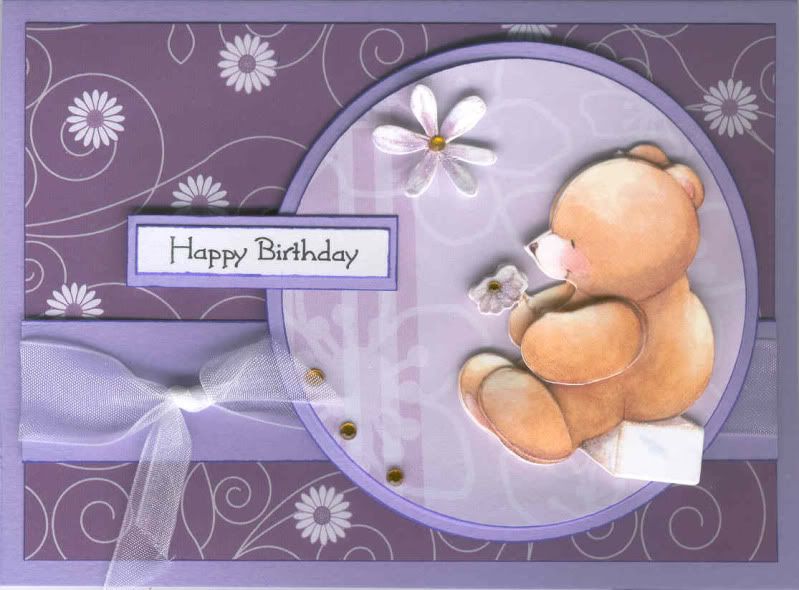
To make the card, a circle of the lilac outline flower and stripe paper, from the Papermania Amethyst Infusion Creative Tones paper pad, was matted onto a larger circle of lilac card, both cut using circle Nestabilities dies. Stickers from a Forever Friends Elements sheet were attached to the circle panel along with three mini yellow faux gems.
A length of white organza ribbon was tied around a strip of lilac card and attached across a panel of purple daisy stripe border swirl paper, also from the Amethyst paper pad.
The circle panel was matted over the ribbon and a Daisy and Dandelion sentiment panel was matted onto lilac card and matted over the edge of the circle panel.
The inside of the card was also decorated, using the purple daisy stripe border swirl paper and a 'Happy Birthday' stamp from the Hero Arts Birthday Messages stamp set, stamped using Versafine Imperial Purple archival pigment ink.
Wednesday, 20 January 2010
Hot Pink and Aqua Rainy Miss Anya
I have finally managed to enter a blog challenge! Hooray!!
I decided to have a go at the current A Spoon Full of Sugar challenge, which is 'Lots of Layering' and decided to use the Rainy Miss Anya image,which is quite apt for the current conditions!
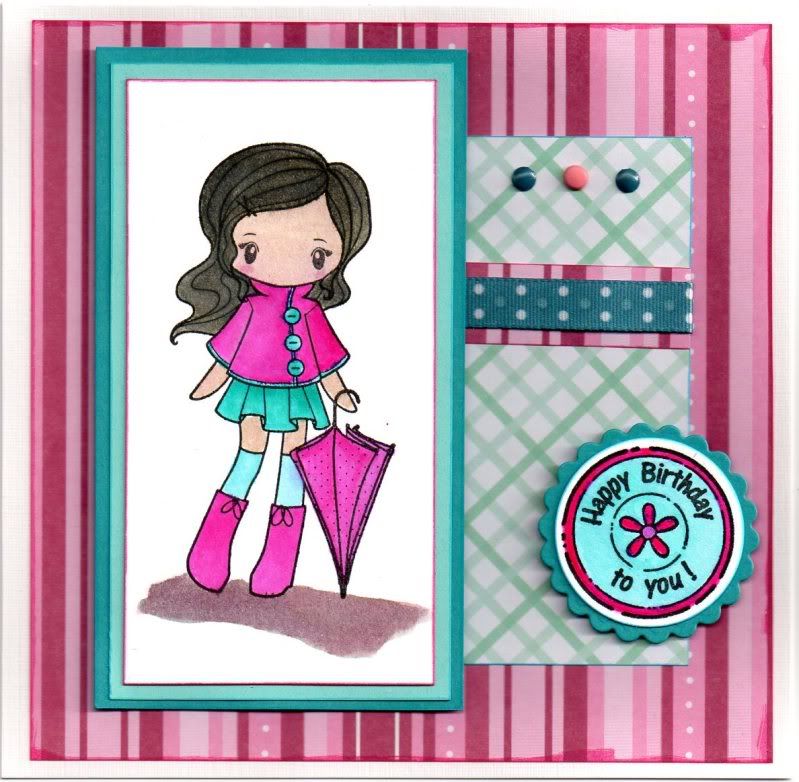
The image was stamped using Versafine Onyx Black archival pigment ink and coloured using a combination of Impress reinkers (Carmine and Pale Aqua), Tim Holtz Distress inks (Tattered Rose, Worn Lipstick and Frayed Burlap) and Marvy Matchables dye ink (Black). The image was then matted onto two shades of blue card.
A strip of the pink stripe paper from the Papermania Claire Curd Big One paper pad was matted over a panel of the aqua plaid paper, and a length of Anita's teal polka dot ribbon was attached across it. Three mini brads were attached at the top of the panel.
The card blank was covered with a panel of the pink stripe paper and the aqua panel was attached to the right.
The greeting panel was created using one of the circle sentiment stamps by Aud Designs and coloured using the Impress reinkers in Carmine and Pale Aqua. This was cut out using a circle Nestabilities die and matted onto a teal scalloped circle.
I decided to have a go at the current A Spoon Full of Sugar challenge, which is 'Lots of Layering' and decided to use the Rainy Miss Anya image,which is quite apt for the current conditions!
The image was stamped using Versafine Onyx Black archival pigment ink and coloured using a combination of Impress reinkers (Carmine and Pale Aqua), Tim Holtz Distress inks (Tattered Rose, Worn Lipstick and Frayed Burlap) and Marvy Matchables dye ink (Black). The image was then matted onto two shades of blue card.
A strip of the pink stripe paper from the Papermania Claire Curd Big One paper pad was matted over a panel of the aqua plaid paper, and a length of Anita's teal polka dot ribbon was attached across it. Three mini brads were attached at the top of the panel.
The card blank was covered with a panel of the pink stripe paper and the aqua panel was attached to the right.
The greeting panel was created using one of the circle sentiment stamps by Aud Designs and coloured using the Impress reinkers in Carmine and Pale Aqua. This was cut out using a circle Nestabilities die and matted onto a teal scalloped circle.
Wednesday, 13 January 2010
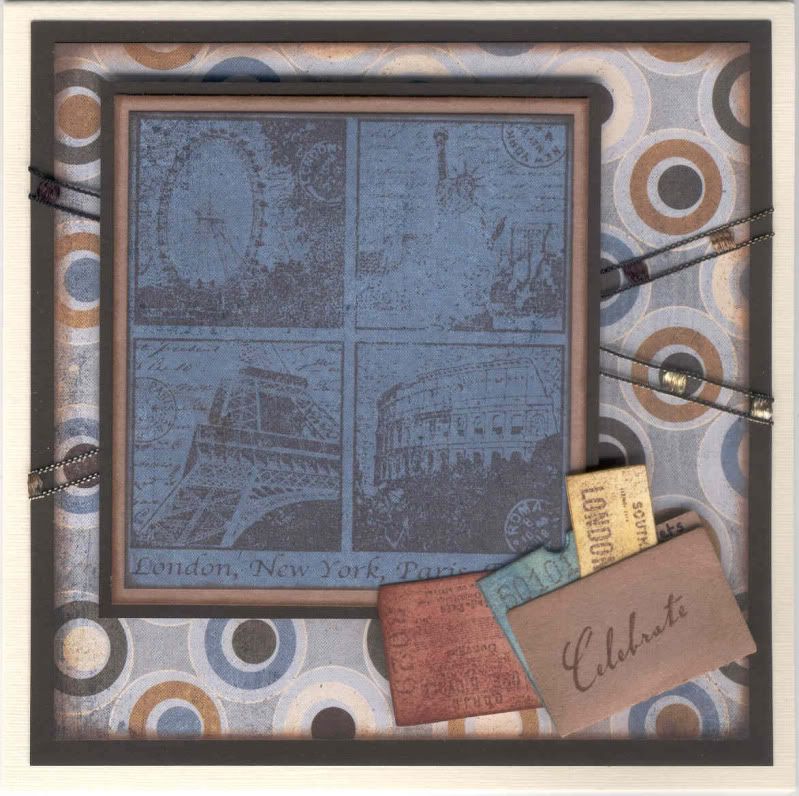
Blue and Brown Landmarks and Tickets
I really like the "London, New York, Paris, Rome" Landmarks stamp from Crafty Individuals, so here's another card made using it. This time I used the Basic Grey Granola paper pad.
 Firstly, the edges of the Crunchy paper from the Basic Grey Granola paper pad were distressed using ColorBox Chestnut Roan fluid chalk ink and matted onto dark brown cardstock.
Then the Landmarks image was stamped onto the Flax paper from the same paper pad using Versafine Vintage Sepia archival pigment ink and matted onto beige and dark brown cardstock. A length of brown ladder ribbon was then wrapped around the Crunchy paper panel.
The Travel Tickets image, also from Crafty Individuals, was then stamped onto cream card using the Sepia ink, and three of the ticket images were cut out and colour distressed using Tim Holtz Faded Jeans and Scattered Straw distress inks and Ink It Up! Chocolate Brown dye ink.
Using the Sizzix Sizzlet file folder die, a beige file folder was die-cut and the edges ink distressed. The word 'Tickets' was hand-written on the tab using a black fineliner pen, and the word 'Celebrate' was stamped on the front using the 'Celebrate with Style' stamp from the Hero Arts Birthday Messages stamp set and the Sepia ink. The ticket images were adhered to the inside of the file folder.
This Landmarks stamp is a great stamp for masculine cards, and I foresee it being used quite a lot in 2010.
Firstly, the edges of the Crunchy paper from the Basic Grey Granola paper pad were distressed using ColorBox Chestnut Roan fluid chalk ink and matted onto dark brown cardstock.Then the Landmarks image was stamped onto the Flax paper from the same paper pad using Versafine Vintage Sepia archival pigment ink and matted onto beige and dark brown cardstock. A length of brown ladder ribbon was then wrapped around the Crunchy paper panel.
The Travel Tickets image, also from Crafty Individuals, was then stamped onto cream card using the Sepia ink, and three of the ticket images were cut out and colour distressed using Tim Holtz Faded Jeans and Scattered Straw distress inks and Ink It Up! Chocolate Brown dye ink.
Using the Sizzix Sizzlet file folder die, a beige file folder was die-cut and the edges ink distressed. The word 'Tickets' was hand-written on the tab using a black fineliner pen, and the word 'Celebrate' was stamped on the front using the 'Celebrate with Style' stamp from the Hero Arts Birthday Messages stamp set and the Sepia ink. The ticket images were adhered to the inside of the file folder.
This Landmarks stamp is a great stamp for masculine cards, and I foresee it being used quite a lot in 2010.
Saturday, 9 January 2010
Pink and Green Victorian Strolling Couple
I have returned. I have just spent three very cold wintry weeks in beautiful Dublin - at least I believe it's beautiful from my previous visits as I didn't actually see any of it this time round.
I've never known such cold weather - and if you thought the British councils were slow off the mark, get this. There were no gritters sent out on New Year's Eve before the first of the January snowfalls, and then they were knocked off for a few days' holiday. When we left on Thursday morning, the roads still hadn't been gritted and cars were skating like Todd Carty on a bad day! It took us over 90 minutes to do a 25 minute trip! When we got back to the UK, we didn't drive on a road with any snow or ice on it, until we reached the last half mile of our journey, the housing estate!
Anyway, I write this from my hibernation chamber where I will be spending the next couple of weeks by the looks of things. I'm definitely not a cold weather person! And, to top it all, the radiator doesn't seem to be working in our bedroom so we'll have to call someone out to have a look at it - and what's the betting they don't come out til the weather warms up - like August!
So, back to all things crafty! Here is a card I made a while back now, using a beautiful image that I got from Jackie/mp3mills in the July 2008 image swap over on docrafts. This was created for a very good friend that I made when I lived in Germany shortly after I got married. Hazel was very good to me and managed to get me an interview for a really good (if not well-paid) job where I was able to use my then recently acquired German degree. Eleven years on, we still keep in touch. I can't believe it's been that long!
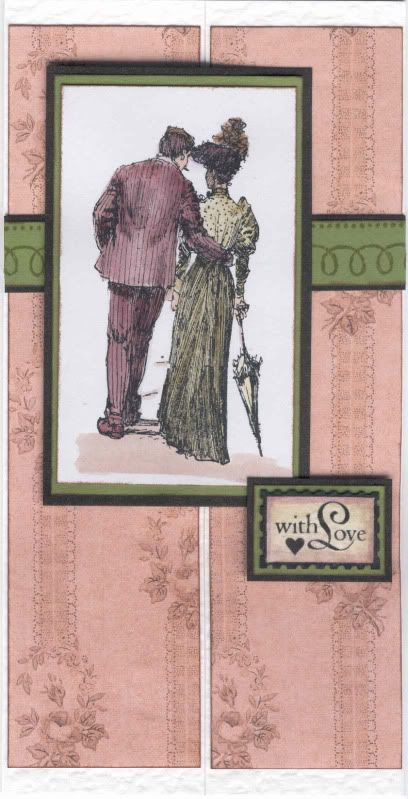
Firstly, a gatefold card was created from white hammer card and covered using the pink blossom lace paper from the Papermania Regency Signature paper pad. These papers are really very elegant and suit the image very well.
A strip of green card was matted onto brown card, stamped using the Studio G border stamps and attached either side of the centre join.
The image, Strolling Couple from Inkadinkado, was watercoloured using the Whispers Brushstroke markers. This was matted onto green and brown cardstock and attached over the centre of the card.
The 'With Love' sentiment, from the All Night Media Brenda Walton Romanza Labels and Tags stamp set, was stamped using the Versafine Onyx Black ink and colour tinted using the Whispers Brushstroke markers. This panel was attached to the right-hand side of the card, and the image was tucked behind it to keep the card closed.
I've never known such cold weather - and if you thought the British councils were slow off the mark, get this. There were no gritters sent out on New Year's Eve before the first of the January snowfalls, and then they were knocked off for a few days' holiday. When we left on Thursday morning, the roads still hadn't been gritted and cars were skating like Todd Carty on a bad day! It took us over 90 minutes to do a 25 minute trip! When we got back to the UK, we didn't drive on a road with any snow or ice on it, until we reached the last half mile of our journey, the housing estate!
Anyway, I write this from my hibernation chamber where I will be spending the next couple of weeks by the looks of things. I'm definitely not a cold weather person! And, to top it all, the radiator doesn't seem to be working in our bedroom so we'll have to call someone out to have a look at it - and what's the betting they don't come out til the weather warms up - like August!
So, back to all things crafty! Here is a card I made a while back now, using a beautiful image that I got from Jackie/mp3mills in the July 2008 image swap over on docrafts. This was created for a very good friend that I made when I lived in Germany shortly after I got married. Hazel was very good to me and managed to get me an interview for a really good (if not well-paid) job where I was able to use my then recently acquired German degree. Eleven years on, we still keep in touch. I can't believe it's been that long!
Firstly, a gatefold card was created from white hammer card and covered using the pink blossom lace paper from the Papermania Regency Signature paper pad. These papers are really very elegant and suit the image very well.
A strip of green card was matted onto brown card, stamped using the Studio G border stamps and attached either side of the centre join.
The image, Strolling Couple from Inkadinkado, was watercoloured using the Whispers Brushstroke markers. This was matted onto green and brown cardstock and attached over the centre of the card.
The 'With Love' sentiment, from the All Night Media Brenda Walton Romanza Labels and Tags stamp set, was stamped using the Versafine Onyx Black ink and colour tinted using the Whispers Brushstroke markers. This panel was attached to the right-hand side of the card, and the image was tucked behind it to keep the card closed.
Subscribe to:
Posts (Atom)


