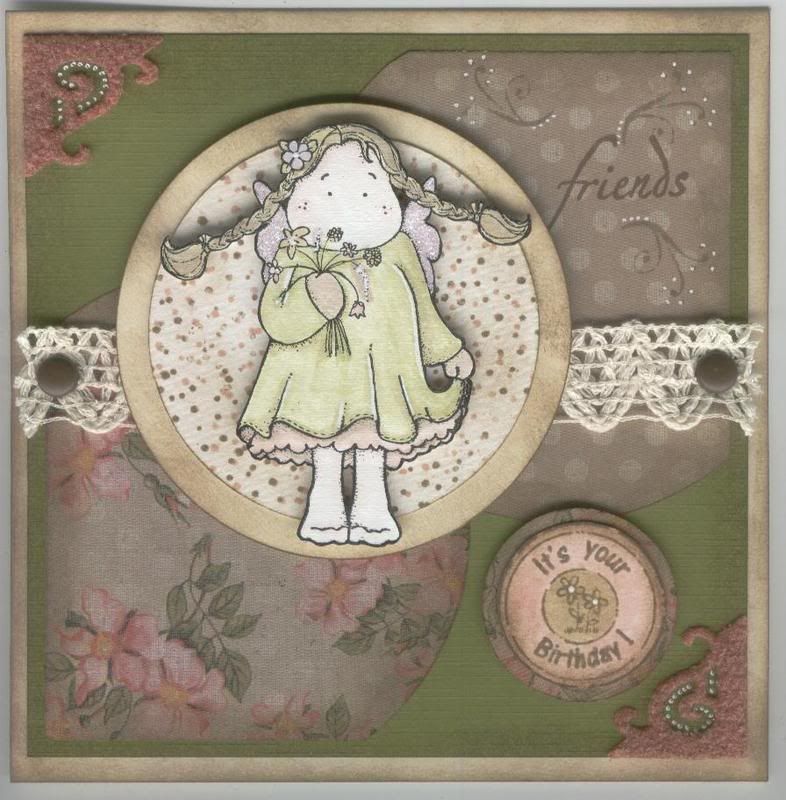
 Here is my entry for this weeks Stamp Something blog challenge. The theme for this week is 'Stamp Something For A Friend'. I needed to make a card for my friend Simone - the mum of the little boy I made the robot card for, so decided this was the perfect challenge for the project.
As I said, her birthday is the same day as mine (29th Dec), and I've been busy trying to get all my birthday and anniversary cards for December and January finished so I can make a start on my Christmas cards (think this is the latest I will have ever started them!!) and not have to worry about not having any cards to send when I get back from the in-laws after New Year.
So, my method for this card began with picking the papers and then colouring the image in to match. I decided to try and colour with the Distress Inks (Frayed Burlap, Scattered Straw, Tattered Rose, Shabby Shutters and Milled Lavender) - not sure if the effect is as good as with the Whispers Brushstroke markers! Highlights were added using a white gel pen and Craft Planet Irridescent Sparkle glitter glue was added to the wings
Having coloured the image I then decided on the layout. This one just kind of evolved. I cut the shapes from the HOTP Pretty Cardmakers Creative pack papers using the Shapecutter and circle template. I distressed the edges using the Frayed Burlap distress ink and some Cut 'n' Dry foam. I attached these to a piece of equally distressed olive card from the Papermania textured cardstock pack.
I wanted to add some fancy corners, so cut some Vivelle using the Ellison Photo Corners die cut, and added some of the Frayed Burlap ink to tone down the brightness of the colour. Highlights were added using a white gel pen.
A length of cream crochet trim was attached across the card using large brown Papermania brads.
Small flourishes were stamped using a morsel stamp from the See D's Connectors Collection set and the Frayed Burlap distress ink and embellished using a white gel pen. The word friends was selectively inked from a stamp in the Clear Choice! Butterflies and Dragonflies set using ColorBox Chestnut Roan Fluid Chalk ink.
The greeting was stamped using one of the Aud Designs circle greetings stamps and the Frayed Burlap distress ink. It was then coloured using the Frayed Burlap, Tattered Rose and Shabby Shutters distress inks, and highlighted with a white gel pen. This wasa cut out and added to a circle of the floral patterned paper.
Two circle mats were cut out using the Shapecutter and circle template. These were both distressed and the white circle was stamped using one of the spotty background stamps from the See D's Mini Deco Backgrounds set using the Frayed Burlap and Tattered Rose distress inks.Tilda was cut out and matted onto the circles.
I must confess that I rather like this card and am pleased that it will be making its way to Australia in December.


























7 comments:
One word for your blog, wow what a great page & love your cards. Denise x
Stunning card ,fabulous image and papers ,Dawnxxx
Oh this is lovely Kathleen, no wonder you're pleased, it has a very Vintage feel,and i'm sure she'll love it xx
Stunning card.Love the color combination.
This is just gorgeous, love that vintage feel too. Great image and layout, love the papers and colors. Fab job! Thanks for playing along with our challenge. :)
Beautiful card Kathleen, it has a real vintage feel! xx
hiya, such a pretty card, I love the colours. great thread you started on docrafts which brought me here.hugs joey.x
Post a Comment