Pages

WELCOME

This blog was created to act as a record of the cards and other projects that I have made. It is for both my own reference and to help inspire anyone who wants to take a look.

I'd love it if you'd leave me a comment so that I know what you think of my projects and that you've been to visit!

Anyone can comment, even those who don't have a blog. (Just look for the word 'Comments' under the three little pictures at the end of each post). Readers without a blog can add an anonymous comment, but please leave your name (and docrafts username if applicable) so I know who you are!

Slideshows of all the cards I've uploaded to my blog can be found at the bottom of the page.


PEOPLE WHO FOLLOW MY BLOG

Showing posts with label Julie. Show all posts

Thursday, 16 June 2011

Purple and Green Gingerbread Tilda Panels

Here is the card I made for my matey Julie B for her birthday.


The Gingerbread Tilda image was stamped using Memento Tuxedo Black dye ink and coloured with Copic markers:
  • Hair: YR23, YR24, Y17
  • Skin: E00, E21, E51, R02, R20
  • Blouse: YG03, YG11, YG13, YG17, Y00, Y02
  • Buttons: V12
  • Hearts/Trousers/Hat: V04, V06, V09, V12
  • Shoes/Basket: E31, E33, E35
On 'girly' characters, I usually just use R20 on the cheeks, but I decided to experiment with R02 and R20 (especially as I now have a few more colours to use) and went for a rosier cheek and I think it rather suits her! Tell me what you think.

The image was then cut out and highlighted with Craft Planet Iridescent Sparkle glitter glue.

A petite oval Nestabilities die was used to die cut a panel of white card which was then stamped around the edge with a small flourish stamp from the Fiskars Friends Forever Quotes stamp set using ColorBox Wisteria fluid chalk ink. This was then matted onto an oval of the green polka dot paper from the Papermania Spring Burst paper pad and a scalloped oval die cut from purple card.
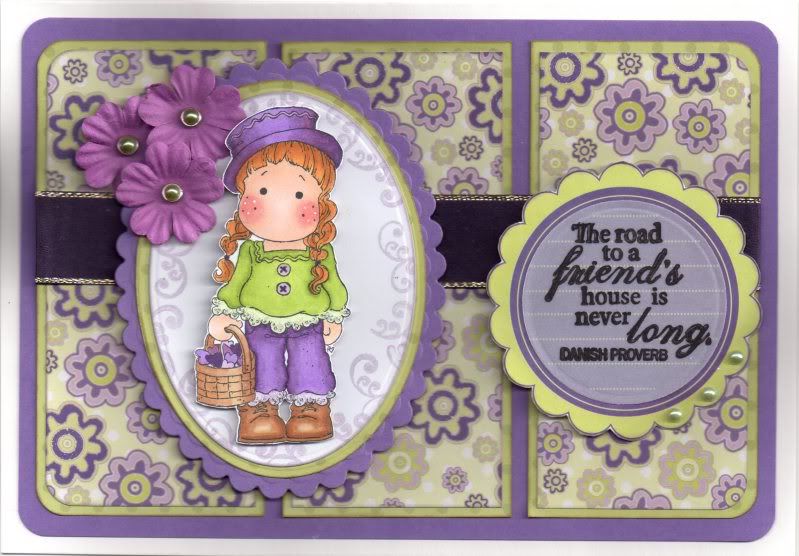

Three panels of the green and purple daisy paper, also from the Spring Burst paper pad, were matted onto the green polka dot paper and a length of wide purple satin ribbon was adhered across all three panels. These were then matted onto a panel of purple card.

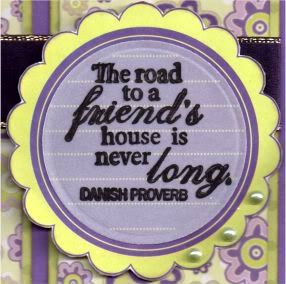
The sentiment, also from the Friends Forever stamp set, was stamped onto white vellum using Brilliance Graphite Black pigment ink and die cut using a circle Nestabilities die. This was then matted onto a Spring Burst journalling page.

The image panel and the sentiment panel were matted onto the panel and three purple paper flowers from The Crafty Cow were added to the panel and image panel with green Papermania pearl brads before the panel was added to the card blank.

Three green Kort & Godt pearls were added to the scallops of the sentiment panel.

Here are the blog challenges I am entering this card into:

Saturday, 19 March 2011

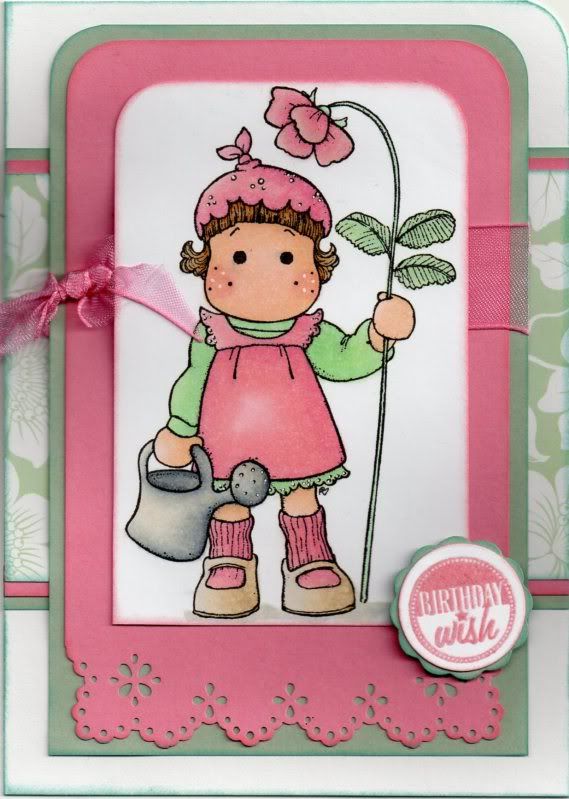
Pink and Tea Green Strawberry Tilda

The Tilda image was stamped during a craft playday at Julie's. Alex very kindly let me stamp a few of her. I really love this image, and in an ideal world, I'd own her!


The Strawberry Tilda image from Magnolia was stamped using Versafine Onyx Black archival pigment ink and coloured using Copic sketch markers:
  • Hair: E13, E35, E43, E57
  • Skin: E00, E21, E51, R20
  • Flower/Hat/Dress/Socks: RV21, RV34, R20, E40
  • Shoes: E40, E41, E43
  • Watering Can: C0, C2, C4, C6, E40
  • Jumper/Leaves/Stem: G00, G12, YG11, YG41, E40
  • Shadow: C2, E40
The top corners of the image panel were then rounded using the large XCut corner rounder punch. A panel of pink card, punched using the Martha Stewart Eyelet Lace corner and border punches was matted onto a panel of green paper and pink organza ribbon was knotted around it. The image panel was then matted on top.


A panel of the tea green floral paper from the Dovecraft Eastern Promise paper pack was matted onto the pink card and green paper and adhered across the card blank and the image panel was matted over the top.

The sentiment, from the HOTP Sentiments stamp set, was stamped using ColorBox Old Rose pigment ink and clear embossed. This was then die cut using a circle Nestabilities die and then matted on a big scalloped circle cut from the green paper.

Here are the blog challenges I am entering this card into:

Saturday, 25 September 2010

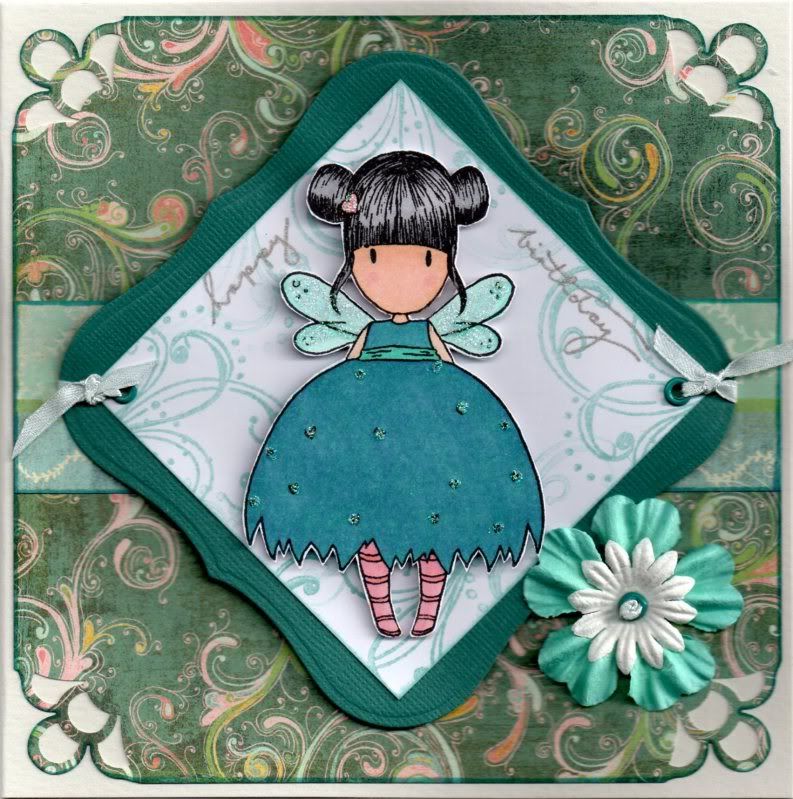
Teal, Pink and Turquoise Bumble Bee Gorjuss Girl

This is one of my favourite Gorjuss Girl images. This image was stamped at Julie's house last August using one of Julie's stamps! I really can't believe how long ago that was now - over 13 months!!!


The Bumble Bee Gorjuss Girl image was stamped using Versafine Onyx Black archival pigment ink, coloured using Copic sketch markers:
  • Hair: N1, N3, N5
  • Skin: E00, E21, E51, R20
  • Socks/Hearts: R20, YR02
  • Dress: BG13, B45
  • Wings: BG11, BG13

and cut out.

A panel of white card was cut out and stamped using one of the flourish stamps from the Autumn Leaves  v1 Flourish Rhonna Farrer stamp set and ColorBox Celadon pigment ink. This was then matted onto a panel of blue Core'dinations card die cut using a Labels 1 Nestabilities die.

A panel of the Spumoni paper from the much underused Basic Grey Two Scoops paper pad was cut and the corners punched using the Martha Stewart Double Loops corner punch.

A strip of the Ice-Cream Parlour paper, from the same paper pad, was adhered across the centre of the punched panel and matted on to the card blank.

The Gorjuss Girl image was placed over the white stamped panel and the 'Happy Birthday' words, from the Woodware Jane's Script sentiments stamp set were stamped either side of the image using the Versafine Smokey Gray archival pigment ink and traced over using the Sakura clear Stardust pen.

Holes were punched in two corners of the Label shape using the Big Bite and small teal Papermania eyelets were set in the holes and light blue satin ribbon was knotted through them.

The Gorjuss Girls image was then added to the centre of the panel using 3D foam pads and Craft Planet Iridescent Sparkle glitter glue was added over the wings, small heart and dress hearts of the image.

A white Papermania Imaginisce paper flower was layered over an aqua Prima flower and a small teal Papermania eyelet was added to the centre. A length of the light blue ribbon was knotted and threaded through the centre as a finishing touch.

Wednesday, 4 August 2010

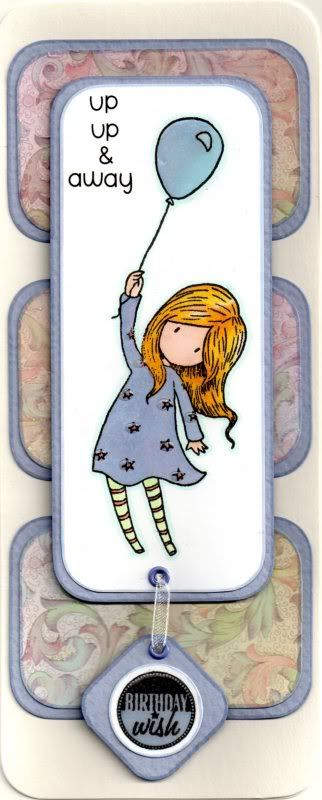
Lilac Up, Up and Away Gorjuss Girl

This is my entry to this week's Simon Says blog challenge, which has a theme of 'Sing It Baby'.

Now, apparently, Nancy Sinatra sang 'Up, Up & Away' so this seems perfect!!


The Up, Up and Away Gorjuss Girl image, from Sugar Nellie, was stamped (at Julie's) using Versafine Onyx Black archival pigment ink and coloured using Copic Sketch markers:
  • Hair: Y08, Y17, YR02, E41
  • Skin: E00, E21, E51, R20
  • Balloon: B41, BV00
  • Dress: B41, BV00, R20, YR02
  • Socks: YG11, R20, YR02
  • Outline: BG11
The image was cut out and the corners rounded using the large XCut corner rounder punch. The image was matted onto lilac card and the sentiment was added using the Doodlebug Beetle Black Simply Sweet alphabet rub-ons.

Three panels were cut form the lilac, pink and green botanical flourish paper from the DCWV Once Upon A Time mat stack and matted onto the lilac card.

The 'Birthday Wish' circle sentiment was stamped onto white card using the Onyx Black ink and coloured using the Copic markers
  • Circle Sentiment: BV00, B41
A square was cut from the lilac card and the corners rounded with the XCut punch. Holes were punched in the bottom of the image panel and in the top of the square. Small lilac Papermania eyelets were set in the holes and white organza ribbon was threaded through creating a dangling sentiment panel.

The image panel was matted over the three panels and Anita's 3D Gloss was added over the balloon, dress stars and circle sentiment.

Tuesday, 4 May 2010

Julie's Blog Candy - CLOSED

The very lovely and talented Julie is celebrating her 100 followers and 10,000 hits on her blog by offering some lovely blog candy.


I have to admit there's some lovely stash up for grabs so I'm keeping my fingers crossed for this one!!!


Up for grabs is:
  • Green at Heart pad from Basic Grey
  • Whiff of Joy Willow stamp
  • couple of LLB paper pads and ribbon set
  • Floral Fantasy Cuttlebug Folder
  • V&A stamps
  • Prima Flowers
  • My Mind's Eye ribbon
  • some buttons (all the colours of the rainbow)
  • Papermania 12x12 Rose pad
To be in with a chance of winning Julie's blog candy, leave a comment on her blog candy post here, and a link on your blog is optional. The blog candy is open until Saturday 15th May and the wiiner will be announced on Sunday the 16th May.

I've been a follower of Julie's blog right from the start, and remember encouraging her to publish it so we could all get to see her lovely creations rather than her keeping them to herself!!

So, nearly two years on and we've come a long way. Julie's one of my bestest crafting mates and if fate conspires to help us, we'll meet up in the future for more crafting sessions!!!

So, head over to her blog to check out her beautiful creations and enter her blog candy.

Tuesday, 22 September 2009

Brown and Teal Penny Black Garden Buggy

Here is my entry to this week's Stamp Something Blog Challenge. The theme this week is to use your favourite colours on your card. My favourite colours at the moment are teal blue and chocolate brown, which seem to be featuring increasingly in home decor.

I decided to use a new paper pad that I bought as a result of my trip to Julie's. Yes, she made me buy something else!! I saw the papers in her pad and thought 'I've got to get me some of them!'

The paper pad in question is the Making Memories Funky Vintage Ruby Collection pad. It has some beautiful bold patterned papers in there!

So, here is my card:


I started by picking out the papers that I wanted to use and coloured my image to match. The image is a Penny Black image called 'Garden Buggy' that I received from Princesskarra over on the docrafts forum. I watercoloured the image using the Whispers Brushstroke markers.

The image was matted onto a panel of the teal mini dots paper from the paper pad and green paper.

A strip of the multi stripe paper was matted onto the green paper and a length of Anita's spotted teal grosgrain ribbon was adhered across the striped paper and attached across a panel of the brown flower and berry paper.

The 'Just For You' sentiment from the Papermania 'Just For You' stamp set was stamped using Versafine Onyx Black archival pigment ink onto white card and watercoloured using the teal Whispers Brushstroke marker. This was cut out using a standard circle Nestie die and matted onto a scalloped circle of the green paper.

Craft Planet Ice Blue glitter glue was used to trace around the edge of the image panel and the sentiment circle.
I also decorated the inside of the card. This was decorated slightly differently to how I had intended to decorate it, mainly because I managed to smudge the blue ink used to edge the panel onto the white paper. So, I decided to overstamp the area with the daisy stamp from the Papermania 'Just For You' stamp set with Marvy Matchables Turquoise dye ink. A folded corner was created using the multi stripe paper from the Ruby paper pad.

Wednesday, 2 September 2009

Purple and Blue Dragonfly Tilda

This is my entry to this weeks 'The Pink Elephant' blog challenge (#30).
This week's challenge consists of a recipe:

1 ribbon
2 squares
something that sparkles

Here is the card I produced:

The Dragonfly Tilda image, from Magnolia, is one that I stamped whilst at Julie's thanks to the lovely Alex.

It was stamped using Versafine Onyx Black archival pigment ink and watercoloured using Whispers Brushstroke markers. The wings were highlighted with Craft Planet Iridescent Sparkle glitter glue. Antennae were added using purple wire from ACE Studio Cards.

A circle of blue paper, cut using a Nestabilities die, was then embossed using the Cuttlebug Swiss Dots folder. This was matted onto a Nestabilities scalloped circle of purple card and highlighted with dots of Craft Planet Ice Blue glitter glue.

A strip of the Jardin paper from the Basic Grey Wisteria paper pad was matted across a square of the White Dynasty paper.

Using the Making Memories Notch and Die tool, two ribbon holes were punched from the scalloped circle and a length of purple metallic ribbon from Dovecraft was threaded through them and attached on the reverse of the White Dynasty paper. This was then matted onto a square of the purple card.

The Tilda image was cut out and layered onto the circles using 3D foam pads.

Purple flower gems, from Papermania, were attached in three of the corners and they were highlighted with the Ice Blue glitter glue, and the floral pattern on the Jardin paper with the Iridescent Sparkle.

The 'Happy Birthday' greeting, from the Hero Arts Birthday Messages stamp set, was stamped in the bottom right-hand corner using Versafine Imperial Purple archival pigment ink.

The inside of the card was also decorated, using the same papers as were used on the front of the card.The sentiment, also from the Hero Arts Birthday Messages stamp set, was stamped using the Imperial Purple ink.

Tuesday, 18 August 2009

A Day At Julie's

Just wanted to let you all know how my day at Julie's went. Early morning (6am!!) and an early train journey into London (or the outskirts at least). I bumped into Alex at the train station as we'd managed somehow to synchronize our arrivals.

After a bit of a chat, and the handing out of goodies, we got underway. Thankfully, they all liked their post-it note holders that I'd made for them (and they didn't fall to pieces in my bag, which I was rather worried about!!). But, I did forget to take a photograph of them, so girls, if you get a chance, please email me a couple of pictures so I can put them on here!

Alex had very kindly given us all one of her little boxes that was filled with chocolate. My dear hubby has been looking at it longingly but I'm blowed if I'm going to let him have them. I might just suck them a little every night so I can taste them but not actually eat them. They should last a while that way too!!! Darn this diabetes!!!

Alex had also assembled a card kit for us all in another beautifully constructed and decorated box. The card was a nice clean and simple design, using the gorgeous Papertrey Ink Damask stamp set (if only they would find a UK distributor/retailer, I'd snap them up in a moment, but with such exorbitant P&P charges, I could never justify the expense).

Anyway, having made my version of the card, I then proceeded to get inky finger prints (Versafine Vintage Sepia) all over it, which I had to disguise when I got home by sponging on the lightest brown colour from the Brilliance Tiramisu ink pad. I also failed to match up the border stamp in the centre of the gatefold!! I really should have a think before I commit anything to paper or card!!

Here is what I managed to create. I don't think it turned out that badly. The card blank was made from brown Kraft card, also available from Papertrey Ink, and brown gems were added to embellish the ornament image.


The second project I attempted was given to us by Julie's friend Lesley. She had prepared a pram template for us all to use, and this time we all managed to make completely different cards. Cutting the template out was the hardest part for some of us (wasn't it "stompy-feet Julie"), but we all produced lovely cards.

Here is my attempt!! I'm not sure what make of papers these are, but I thought they were perfect for a 'just in case' baby card, to keep for when you do need one!!

The Cuttlebug Swiss Dots embossing folder was used on the hood and the Fiskars Apron Lace border punch was used to create the lace trim. Craft Planet yellow glitter glue was added to the dots on the hood and along the top of the paper lace trim. A large Stampin' Up flower punch and a second smaller flower punch were used to create the layered flower in the top corner. The brad was originally pink, so was coloured using a green Copic marker and a blob of the yellow glitter glue.

Buttons from my stash were added to the wheels and the hood (when I got home), after threading them with green embroidery thread.

Alex very kindly did a demonstration of how to use the Copics to their best, so when/if I get around to buying any, I'll have more of an idea of how to get those great effects that so many of you all produce!!!

Also we all had a go at the monochrome look using the Tim Holtz Distress inks on a stamp and dragging the colour out, just as Alex had done on a Sarah Kay card she made last week. I decided to use the technique on one of the lovely house stamps from Papertrey Ink and the Weathered Wood ink. I haven't made the images into cards as yet, but will upload them when I have.

The rest of the day (and somehow there wasn't much more!) was spent stamping up each others various images that we had brought with us. Before we knew it, it was almost 7pm and we had to start tidying everything away.

Amazingly, that didn't take as long as we had anticipated, so we made our way back to the train station. We said our goodbyes (reluctantly) and headed off home. It was 10.45pm when I got home and was pretty bushed, but it was all worth it for an amazing day spent with friends - 'cos that's what you are girls!!! I never thought that two very special friends could be made through a forum, but they can and you are the proof!! Hopefully my move up north won't spell the end of our get-togethers. We'll have to figure a way around that! Not sure how big my new house is going to be, but maybe a weekend in Lincolnshire is on the cards.

Well, enough of all this soppy-ness! Hopefully I'll get around to uploading a few more cards tomorrow. Not sure which ones though. I'm still a bit behind on my uploads, so I might add a few of the anniversary cards I've been making.

Friday, 14 August 2009

Weekend Get-Together

OK - so I haven't uploaded the men's cards, but I've been far to busy. You see, I'm meeting up with a couple of friends from the docrafts forum on Saturday and I wanted to make them each a little gift, so I've been busy beavering away making them. I'll try and either scan them in or take some photos and upload the pictures next week (assuming I can find the cable to connect the camera to the laptop!!)

I'm really excited to see Jules and Alex again, and a friend of Jules is also coming along so I look forward to meeting her too.

This will also be my first post-diabetes solo trip so a bit nervous about that aspect of things, but I shall have my insulin and a snack with me to make sure I'm OK.

Well, got to go and put the finishing touches to my little gifts, then off to bed. Need to decide what stash to take with me and see if I can find my little cutting mat. I think it's in a box somewhere!!!

Sunday, 7 June 2009

Pink Leanne Ellis Girl with Bird Cage Gatefold

Finally I can upload this card! I've been wanting to upload this for a couple of weeks now, but restrained myself as I didn't want the recipient (Jules B) to get a glimpse of it before her birthday. But, I know she's received it now, so I can put it on my blog!


The card was made using one of my newest acquisitions - one of the lovely Leanne Ellis stamps called 'Fly Free' fron the Sugar Nellie family, available from Funky Kits.

I started by creating an off-centre gatefold 6" square card made from plum card. The flaps were covered with a combination of pink multi spots paper and purple mesh paper, both from the HOTP Citrus Cardmaker's Creative Pack. A strip of sky blue card from the DCWV Brights Card Stack was added across the right-hand flap.

A length of Anita's self-adhesive satin ribbon was added to hide the join of the two papers on the left-hand flap, and a length of narrow white lace was added down the edge of the left-hand flap.

The 'Fly Free' image was stamped using the Versafine Onyx Black archival pigment ink and watercoloured using the Whispers Brushstroke markers. The background colour, Whispers Rich Plum permanent dye ink, was added by sponging around the image.

A clear faux gem was added to the centre of the flower in her hair.

The sentiment 'Fabulous Friends', from the Smirk Love and Friendship stamp set, was stamped onto the image panel using the Onyx Black ink, and the panel was matted onto dark plum paper.

A tag was cut from the HOTP Citrus Cardmaker's Creative pack and a large silver eyelet set at the top. A piece of the lace was threaded through the eyelet, and a strip of the pink self-adhesive ribbon was attached across the tag, with a Prima paper flower attached to the edge of the tag with a small silver brad. The sentiment 'A Day To Celebrate', from the Hero Arts Birthday Messages stamp set, was stamped across the top of the tag using the Onyx Black ink.

The tag was backed with the dark plum paper so that it looked better when the card was opened. The image panel was attached at an angle to the left-hand flap, and the tag to the right-hand flap. Clear faux gems were adhered in rows of three to the top right and the bottom left corners.

A 'handmade by' panel was created for the reverse of the card using paper and card used on the front of the card, the Sizzlit Elegant Embellishments die, standard and scalloped circle Nesties and a strip of the narrow white lace used on the front.

Thursday, 13 November 2008

A Great Day of Stamping, Crafting and Making Friends

I meant to post this on Sunday but I had great problems with my Internet connection, and then I've just not had a chance to sit down and get on with it since.


Anyway, I'm talking about last Saturday - although the day actually started on the Friday as I didn't sleep at all on Friday night (believe me, this took its toll later on in the day!!)

I was up at 5.45am (I didn't realize there WERE two 5.45's in the day!), showered, dressed and in the car and heading for Newbury train station by 6.45am. I was on my first train at 7.05am and on my way to West Sussex. I only had one problem with the trains -probably due to the wrong sort of rain on the line, so missed my connection at Redhill, but thankfully I eventually arrived at Haywards Heath just 30 minutes later than anticipated.


There I was met by the lovely Alex (I sort of recognized her from her blog picture and was hoping I wasn't smiling like a mad person at a complete stranger!!) and from there we headed to the Glitter Pot where we met up with Julie and Sarah, who had made the trip from London and Surrey respectively. Michelle Saxon was there demonstrating the BIA and the Dreamkuts, and we all took notes as we all wanted to have a play with the BIA later on in the day. Having spent far too much money in The Glitterpot, we then headed off to Alex's house for an afternoon of crafting.


We all decided to get lunch out of the way, but not before some great gifts were exchanged. Alex gave us all some wonderful hand-made goody bags, each containing a lovely calendar, some stamped images from the new Magnolia Christmas collection, and some beautiful papers. Julie had made us all a lovely book of papers, made with her BIA,


here is the book she gave to me:


and Sarah gave us all a box of Belgian Praline chocolates (one of my favourites!)


After lunch, we decided to make the most of Alex's graphic design background and get her to give us all a crash course on using the Copic Markers. When used properly, the effects really are amazing. The colours are so vibrant and they blend beautifully - but, only when done properly!! I think I'd want to practise a bit more before I committed to spending all that money on them.


After our colouring lesson, we all took advantage of Alex's amazing collection of stamps and started stamping some images out. This was accompanied by a delicious Donauwellen cake that Alex had made herself, and reminded me of 'Kaffee and Kuchen' when I lived in Germany. I love all those rich German cakes and this was no exception.


Then, with the exception of Julie who made a start on her calendar, we all started to make mini books following the instructions given by Michelle Saxon earlier in the day (although of course there's always one person who manages to mess their design up completely due to not paying attention - stop pointing fingers at me!! :}).


At about 5pm, my eyes started to get very sore and itchy, no doubt a result of the fact that I hadn't slept the night before!!


Unfortunately, the day had to come to an end. Julie and Sarah bid their farewells at 6pm and headed home. I stayed a bit later as my train wasn't until 7.30pm. Alex dropped me off at the train station and we both expressed our hopes that we'd be able to do this all again!! I have to admit I really enjoyed the day and would love to do it all again, but it was a very long and tiring day!!


Thankfully all my trains were on time on the way home. I almost missed getting off the train at Gatwick but realized just in time where I was and managed to jump off. I didn't fall asleep at all on the journey home amazingly, and was picked up from Newbury station by my lovely hubby at 10.20pm.

If I ever manage to sort out my mini book I'll post a picture of it on here for you.
Blog Widget by LinkWithin