Pages

WELCOME

This blog was created to act as a record of the cards and other projects that I have made. It is for both my own reference and to help inspire anyone who wants to take a look.

I'd love it if you'd leave me a comment so that I know what you think of my projects and that you've been to visit!

Anyone can comment, even those who don't have a blog. (Just look for the word 'Comments' under the three little pictures at the end of each post). Readers without a blog can add an anonymous comment, but please leave your name (and docrafts username if applicable) so I know who you are!

Slideshows of all the cards I've uploaded to my blog can be found at the bottom of the page.


PEOPLE WHO FOLLOW MY BLOG

Showing posts with label Mothers Day. Show all posts

Sunday, 27 March 2011

Pink and Burgundy Heart Flower and Sparkler Mother's Day

Here are the Mother's Day cards that I made this year for my mum and my Mother-in-Law using the lovely stamps that I won from the lovely Janet when she hosted a Pink Gem blog candy. I also wanted to use my new inkpads (you'll see more of them soon I'm sure!) from Adirondack.

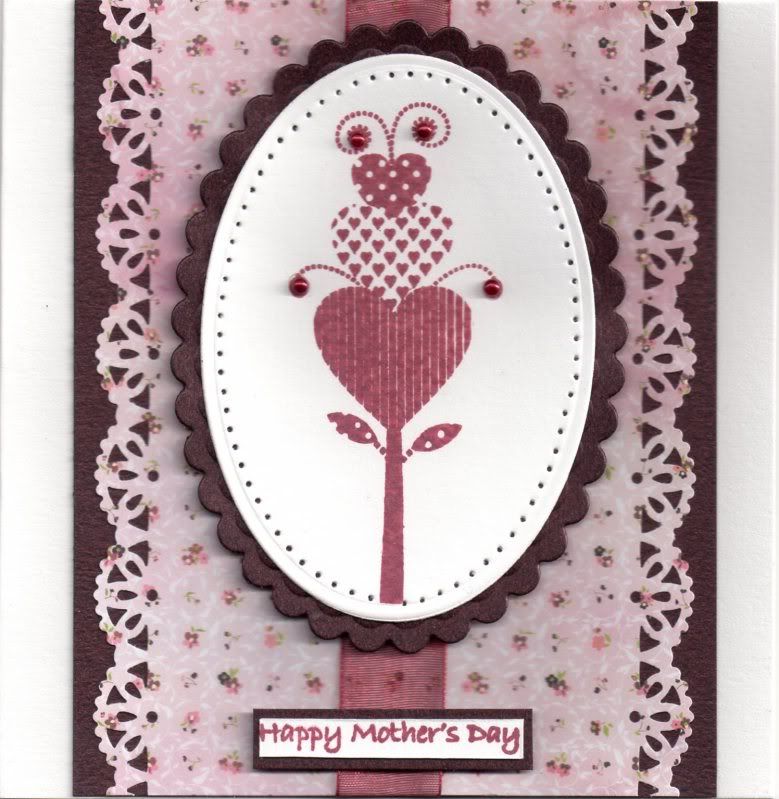
This is the card that I made for my mum:


The Heart Flower image, from the Pink Gem Funky Flowers stamp set, was stamped using Adirondack Raisin dye ink and die cut using a Petite Oval Nestabilities die. This was then pierced around the edge using the Stampin' Up piercing template (Mat Pack) and matted onto a Petite Scalloped Oval die cut from burgundy shimmer card.

A panel of the Extravagance paper from the Basic Grey Eva paper pad was punched along the edges using the  XCut Sparkler border punch and matted onto a panel of the burgundy card.

A length of burgundy organza ribbon was wrapped around the panel and matted onto the front of the card blank.

The sentiment, from a free stamp from Craft Stamper magazine designed by Personal Impressions, was also stamped using the Raisin ink and matted onto the burgundy card. Both the image and sentiment panels were then positioned centrally over the ribbon.

Burgundy self-adhesive pearls, from the Hobby House Ruby Mix, were then added to the Heart Flower image.

And here is the variation on this that I made for my Mother-in-Law:
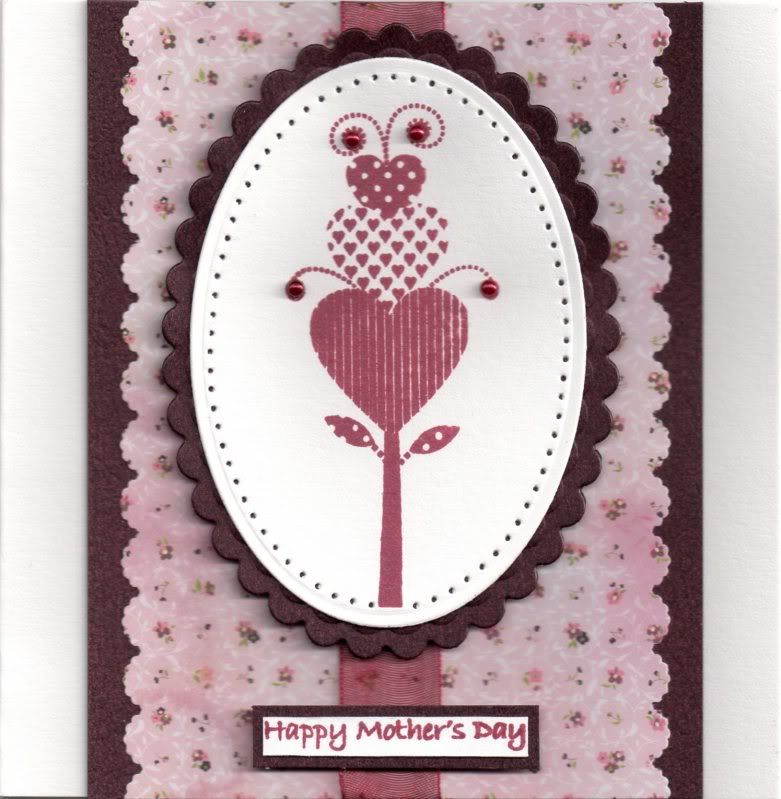

This one was made in exactly the same way, except the edges of the Extravagance paper was punched with the EKSuccess Scalloped Scallop border punch.

I'm really quite pleased with these!

Here are the blog challenges that I am entering these cards into:

Friday, 19 March 2010

Pink and Green Mother's Day Hanging Card

This is the card I made for both my mum and my mum-in-law. It is also my entry to this week's Pink Elephant blog challenge, the theme of which is Spring.

Three panels were cut from dark brown card using the Label 3 die. A panel of the Whisper paper from the Basic Grey Sultry paper pad.

The two sentiment toppers were created by stamping the 'Just For You' circle sentiment, from the Papermania Just For You stamp set, twice, using Versafine Onyx Black archival pigment ink and cut out using a circle Nestabilities die. These were both matted onto a larger pink circle and a brown scalloped circle, also cut with the Nestabilities die.


The 'Happy Mother's Day' circle sentiment was created in Word and cut out using a Nestabilities circle die, and adhered over the 'Just For You' sentiment.

For the centre panel, the Waiting Tilda image was stamped using the Memento Tuxedo Black dye ink and coloured using the Copic Sketch pens.
(Hat: RV06, RV34, N3; Jumper: YG07, YG17; Trousers: E35, E57, N5; Hair: Y00, Y17, E35; Skin: E00, E02, E11, R20).

The image was cut out using the Nestabilities Label 3 die, and matted onto a hand-cut panel, made by cutting around the outside of the same die with a craft knife. This was then matted onto the brown label shape.
For the reverse side of the hanging card, the letters to spell out 'MUM' were die cut using the Sizzix Sizzlets Bounce die cuts cut from pink and brown card and matted onto white and pink panels cut using the Labels 3 Nestabilities dies. This in turn was matted onto panels of the Polished and Dressy papers from the Sultry paper pad and green paper.

A pink paper flower was attached to each of the panels and a silver Papermania shimmer dot was added the their centres.

Holes were punched to join the three panels together and threaded with olive green organza ribbon.

Thursday, 19 March 2009

Pink and Brown Floral Mother's Day Tagbook

Well, I finally got the second Mother's Day tagbook finished. I was starting to think I was going to have to swap them round as the first one I made was intended for my MIL and doesn't need to be posted as she will be with us on Sunday, whereas my mum's did have to be posted!! However, after yet another late night, I managed to get it finished in time for today's post!


Three tags were cut from dark brown cardstock, and a spine was scored down the left hand side. Three holes were punched through the three tags using the Big Bite. As preparattion for the tagbook, a piece of the pink 'Happy Mother's Day' text paper from the Papermania Flowery Colossal paper pad had computer-generated 'Happy Mother's Day' text printed on it in brown.


The first tag was covered with the multi-coloured floral paper from the Papermania Flowery Colossal paper pad.

A flower was cut from the yellow outline flower paper from the same pad and coloured using the Whispers Brushstroke markers, and highlighted with white gel pen. Pink faux gems were added to the flower, and then attached to a panel of the pink 'Happy Mother's Day' text paper, which in turn was matted onto the dark brown card.

A strip was cut from the printed section of the pink 'Happy Mother's Day' text paper and matted onto a strip of the brown card. This was then adhered along the edge of the tag.


I then made a start on the inside pages.


For page two, the tag was covered with the multi-coloured stripe paper from the Flowery Colossal paper pad. A strip was cut from the computer-generated text paper and matted onto the brown card.

A flower was cut from the yellow outline flower paper from the pad and coloured using the Whispers Brushstroke markers, and again highlighted with white gel pen. Pink faux gems were added to the centre of the flower.


For page three, the tag was covered with the brown floral paper and a strip of the multi-coloured stripe paper from the pad was matted onto a strip of the salmon pink card.

The letters were cut from the salmon pink and brown card using the Sizzix Sizzlets Bounce Alphabet die set.

A white/pink Prima paper flower was coloured on the edges using a salmon pink Whispers Brushstroke marker and a white bead was attached in the centre.


For page four, I chose a definition from the HOTP Definitions and Words Ephemera book.


This was matted onto a panel of the multi-coloured stripe paper. The tag was covered with the pink 'Happy Mother's Day' text paper, and the definition panel matted on top.

A flower was cut from the yellow outline flower paper and coloured using the Whispers Brushstroke markers and highlighted with white gel pen. Pink faux gems were added to the centre of the flower.


For page five, the tag was again covered with the brown floral paper, and a strip from the computer-generated text was matted onto the salmon pink card.

Another white/pink Prima paper flower was coloured with the salmon pink pen and pink faux gems were added to its centre and the lower corner of the tag.


For the back page, the tag was covered with the multi-coloured floral paper A smaller tag was made from the salmon pink card and brown satin ribbon was threaded through the holes. A computer-generated sentiment was adhered on the top.

The corners of the tags were rounded using the XCut Large corner rounder punch and then tied together using Anita's Copper Brown striped grosgrain ribbon and cream fibre.

Hopefully my mum will like the tagbook. I certainly enjoyed making it, despite the time pressures. I really wish I could be more organized when it comes to getting cards made in advance. Hopefully once I get my craft room back to normal (I have to pack it all up again on Friday for the in-laws' visit) I'll spend more time in there and get more cards made. I've got two to make before I pack up, and hopefully I'll get them done tomorrow!!

Monday, 16 March 2009

Blue Butterfly Mother's Day Tag Book

Here is the first of the two tag books I've decided to make for Mother's Day this year. I wanted to make something special this year as I didn't manage to make any Mother's Day cards last year due to the house move and all my stash still being boxed up.

I started by making the three tags from blue card. The tags were scored to create a spine to make opening the tag book easier. Each side of the tags was covered with patterned paper from the Papermania Flowery Colossal paper pad.

The front page was covered with the butterfly paper and was decorated using a butterfly cut from the remainder of the sheet and silver wire antennae were added. This was matted onto a piece of the blue/green spots paper from the same paper pad. The sentiment was cut from the 'Happy Mother's Day' text paper and matted onto the blue cardstock.


Page two was covered with the blue/green spots paper and a strip of the 'Happy Mother's Day' text paper. This was also decorated with a butterfly with wire antennae.


Page three was covered with the 'Happy Mother's Day' text paper (a section without the text) with a strip of the blue/green spots paper over the top. The 'MUM' letters were cut using the Ellison Curlie Girlie thin cuts alphabet set and embossed using the Ellison Spots embossing folder. The letters were coloured using the ColorBox Prussian Blue Fluid Chalk ink.


The tag was finished with a blue Prima flower embellished with a pearl bead.


Page four was covered with the blue/green abstract paper from the Papermania Flowery colossal paper pad, with a smaller panel of the blue/green spots paper over the top. A butterfly was cut from the butterfly paper and wire antennae were added. A definition from the HOTP Definitions and Words Ephemera was added and embellished with a light blue faux gem.


Page five was also covered with the blue/green abstract paper and a strip of the 'Happy Mother's Day' text paper was attached over the top. A blue Prima flower, embellished with a light blue faux gem was adhered to the bottom of the tag along with a row of larger light blue faux gems.


The back page was covered with the butterfly paper and a tag made from green card was added with pale blue organza ribbon threaded through the holes.


Holes were punched through all the tags along the spine section and were tied together with narrow light blue satin ribbon and blue/green fibre. The corners of each page were punched with a corner rounder and the edges of each of the tags inked with the ColorBox Prussian Blue Fluid Chalk ink.

I shall be entering this into Clare Curd's Card Challenge this week which is to create a card for Mother's Day. Follow the link for more details on how to enter.
Blog Widget by LinkWithin
