Pages

WELCOME

This blog was created to act as a record of the cards and other projects that I have made. It is for both my own reference and to help inspire anyone who wants to take a look.

I'd love it if you'd leave me a comment so that I know what you think of my projects and that you've been to visit!

Anyone can comment, even those who don't have a blog. (Just look for the word 'Comments' under the three little pictures at the end of each post). Readers without a blog can add an anonymous comment, but please leave your name (and docrafts username if applicable) so I know who you are!

Slideshows of all the cards I've uploaded to my blog can be found at the bottom of the page.


PEOPLE WHO FOLLOW MY BLOG

Showing posts with label Alex. Show all posts

Saturday, 19 March 2011

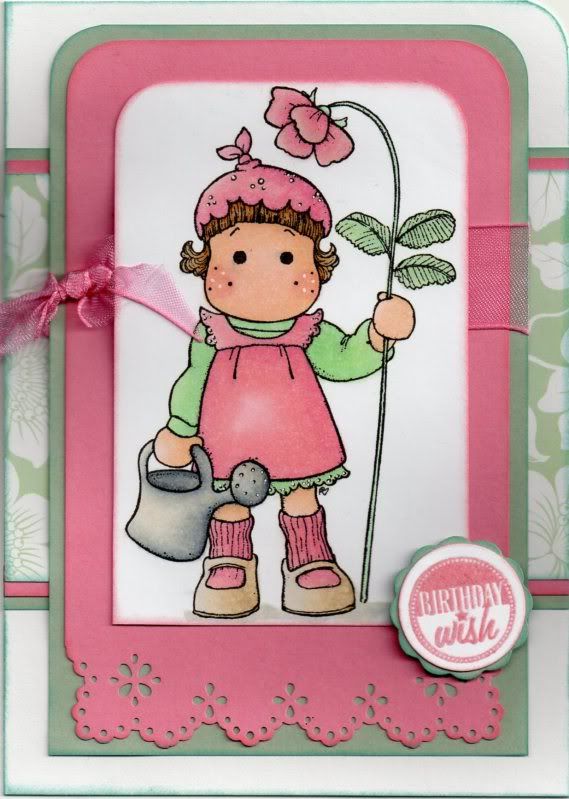
Pink and Tea Green Strawberry Tilda

The Tilda image was stamped during a craft playday at Julie's. Alex very kindly let me stamp a few of her. I really love this image, and in an ideal world, I'd own her!


The Strawberry Tilda image from Magnolia was stamped using Versafine Onyx Black archival pigment ink and coloured using Copic sketch markers:
  • Hair: E13, E35, E43, E57
  • Skin: E00, E21, E51, R20
  • Flower/Hat/Dress/Socks: RV21, RV34, R20, E40
  • Shoes: E40, E41, E43
  • Watering Can: C0, C2, C4, C6, E40
  • Jumper/Leaves/Stem: G00, G12, YG11, YG41, E40
  • Shadow: C2, E40
The top corners of the image panel were then rounded using the large XCut corner rounder punch. A panel of pink card, punched using the Martha Stewart Eyelet Lace corner and border punches was matted onto a panel of green paper and pink organza ribbon was knotted around it. The image panel was then matted on top.


A panel of the tea green floral paper from the Dovecraft Eastern Promise paper pack was matted onto the pink card and green paper and adhered across the card blank and the image panel was matted over the top.

The sentiment, from the HOTP Sentiments stamp set, was stamped using ColorBox Old Rose pigment ink and clear embossed. This was then die cut using a circle Nestabilities die and then matted on a big scalloped circle cut from the green paper.

Here are the blog challenges I am entering this card into:

Friday, 18 February 2011

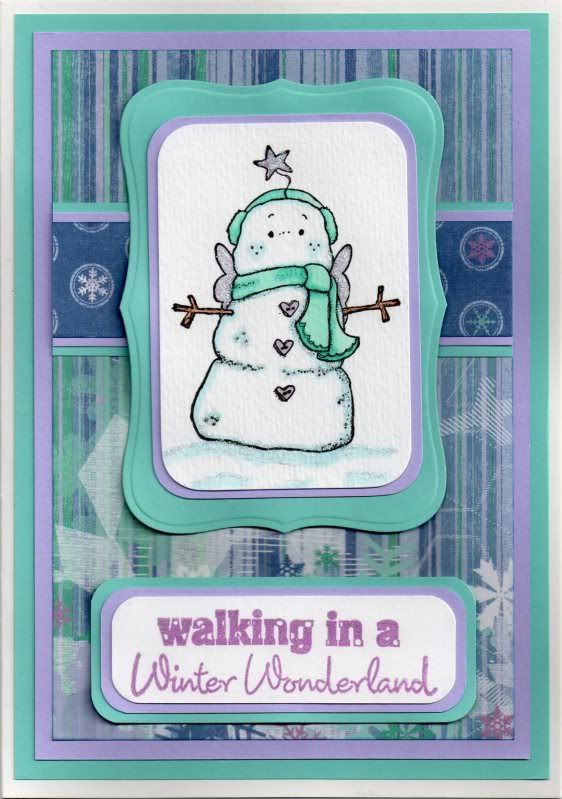
Lilac and Turquoise Magnolia Snowman

Well, here it is - the very last of my Christmas cards from last year! This is the card I made for hubby using one of the really cute Magnolia snowman stamps.


The Snowman image, from Magnolia, was stamped during a fun day at Alex's a couple of years ago - and I've finally got around to using it! (I can't believe that was two and a half years ago now!!)

The image was stamped using Versafine Onyx Black archival pigment ink. It was actually stamped onto card not designed for Copics but I gave it a go and it worked, mainly because it didn't require much colouring.
  • Scarf/Ear Muffs: BG11, BG13
  • Wings: BV00, C0
  • Arms: E13
  • Star/Buttons: BV00
  • Snow Highlights: B00
The image, once coloured with the Copics, was highlighted with Craft Planet Iridescent Sparkle glitter glue and the corners rounded with the large XCut corner rounder punch. The panel was then matted onto lilac card and a panel of turquoise card cut using the Labels 8 Nestabilities die.

A strip of the blue snowflake dots paper from the HOTP Ultimate Christmas Creative Pack was matted onto the lilac and turquoise card and then across a panel of the blue, turquoise and lilac stripes and snowflakes paper, from the same paper pad.

The sentiment, from the Daisy and Dandelion Percy & Penelope Christmas Greetings stamp set, was stamped using Brilliance Pearlescent Purple pigment ink and matted onto the lilac and turquoise card.

Sunday, 30 January 2011

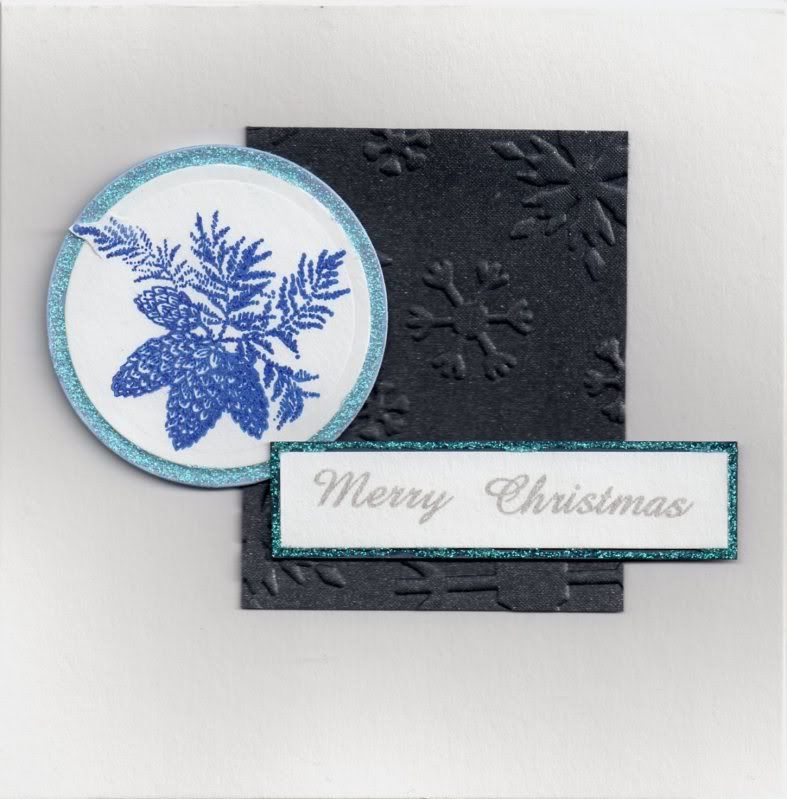
Blue Pine Cone and Branches

OK, so I wasn't sure whether or not to blog the Christmas cards I made what with it being nearly February, but, since this is supposed to be a record for me of what I've made, as well as a forum for me to show off (my cards), then I decided 'what the heck!'

So, here goes! I'll try and blog one a day (there are only 10 or 11 different designs I think, so they'll be over soon enough!!)

Here is the first one!


This card was shamelessly based on a card that the lovely Alex K/Eisbaerin made for the docrafts Creativity Magazine. Her version was dusky pinks from memory, but I decided to go with blues.

The Pine Cone and Branches image, from the Papermania Silent Night Icons stamp set, was stamped using Versafine Majestic Blue archival pigment ink. The image was then die cut using a circle Nestabilities die and the out-of-the-box technique. This was matted onto a panel of light blue card.

The sentiment, from the Papermania Gifts and Robin free stamp set, was stamped using Memento London Fog dye ink and matted onto dark blue card.

Craft Planet Ice Blue glitter glue was then added around the edges of the image and sentiment panels.

A panel of blue shimmer card was embossed using the Papermania Snowflakes embossing folder and all the elements layered onto the card blank.

Sunday, 12 December 2010

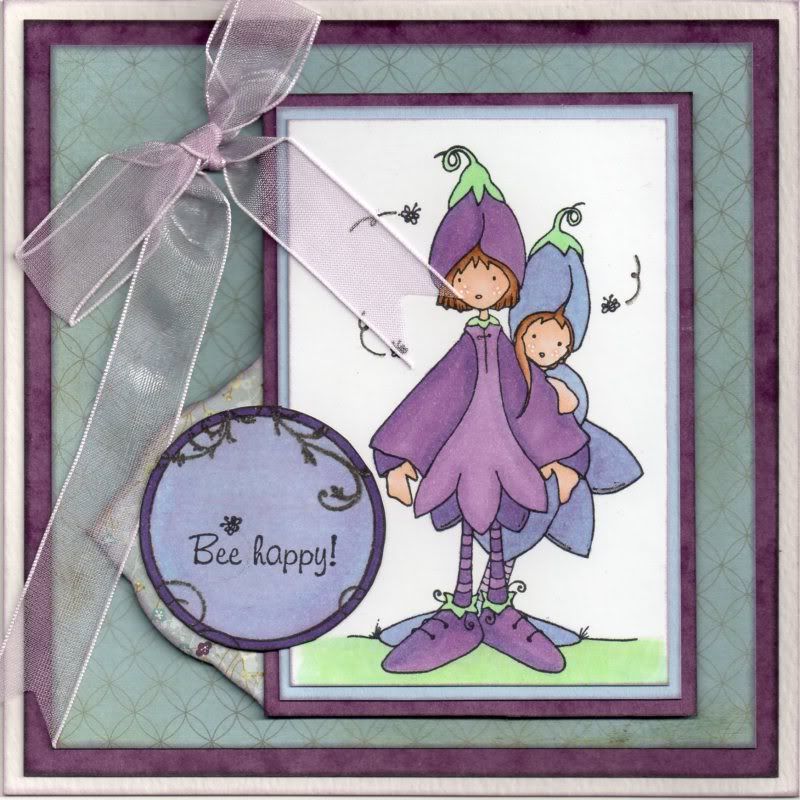
Light Blue and Violet Foxglove Friends

I can now blog this card as I know the recipient (Alex K/Eisbaerin) has now opened her card!

I fell in love with this image the first time I saw it and managed to get hold of it a few months ago. I decided to use the lovely Basic Grey Wisteria papers and coloured my image to match.


The Mr and Mrs Foxglove image, from Whiff of Joy, was stamped using Memento Tuxedo Black dye ink and coloured using Copic Sketch markers:
  • Foxglove 1: V12, V15, V17, B21, G00, BG11, YG11
  • Foxglove 2: V12, B21, G00, BG11, YG11
  • Hair: E13, E35, E57
  • Skin: E00, E21, E51, R20
  • Bees: V12, N1
  • Grass: BG11, YG11
I decided to interpret the image as two females as it's not obvious that it's a 'Mr & Mrs' image, at least I don't think so. The image was then matted onto light blue and purple card.

A panel of the Pond paper from the Basic Grey Wisteria paper pad was matted onto the purple card and then onto the card blank.

Using the Violet paper from the same paper pad, a panel was die cut using a Labels 3 Nestabilities die and attached behind the image panel.

The circle flourish stamp from the Fiskars Harlequin Charm stamp set was stamped using Versafine Onyx Black archival pigment ink and cut out along the outer edge of the circle. The sentiment from the Foxglove stamp was stamped in the centre of the circle using the Tuxedo Black ink and the circle was then coloured using the Copic markers:
  • Sentiment panel: V17, B21, V12
This was then attached over the Labels 3 panel and the edge of the image panel.

A bow was created from lilac organza ribbon using a bowmaker and attached in the top left corner of the card.

Highlights were then added to the image using a Papermania Snow White gel pen and to both the image and sentiment panels using a clear Sakura Stardust pen.

Here are the challenges that I am entering this card into:

Sunday, 10 October 2010

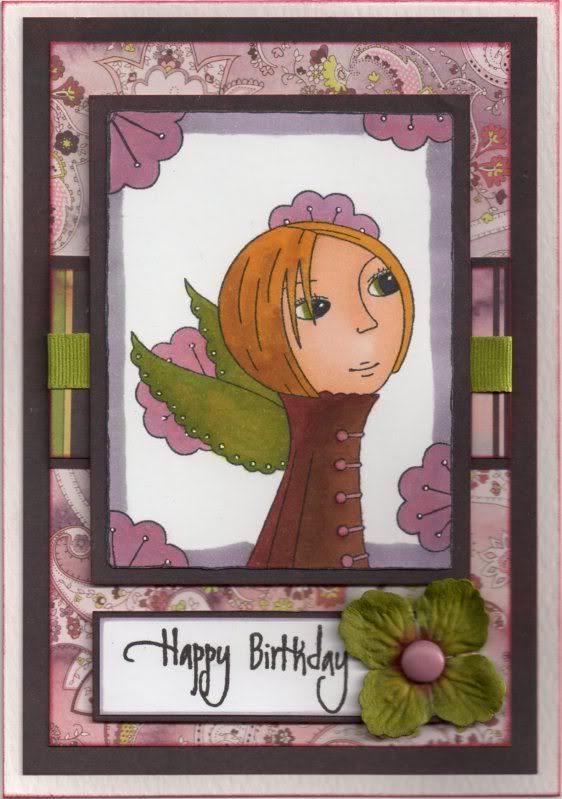
Burgundy and Olive Leanne Ellis Dreamer

This is the card that I made for the lovely and very talented Teresa for her birthday. I know that she has received this now so am free to upload it.


The beautiful Dreamer image, by Leanne Ellis for Sugar Nellie, was kindly donated to me last year by Alex K as a birthday gift. I love these images and they are on my ever-growing wish list.
The image was coloured using Copic Sketch markers:
  • Hair: E13, E35, Y08
  • Skin: E00, E21, E51
  • Jacket: E57, E39, RV21
  • Eyes/Wings: YG17, Y08, N3
  • Flowers: V12, RV21, R20, BV31
  • Outline: V12, BV31, N3
 and matted onto the Dauphin paper from the Basic Grey Eva paper pad.

A strip of the Aristocrat paper was matted onto the Dauphin paper and a length of Anita's olive green grosgrain ribbon was added around it. This was then matted across a panel of the Versailles paper from the same paper pad.

The sentiment panel was created by stamping onto white card using the 'Happy' and 'Birthday' stamps from the Elzybells Swirly Sentiments stamp set using Versafine Onyx Black archival pigment ink and matted onto the Dauphin paper. A green Prima paper flower was coloured using Copic markers:
  • Prima flower: YG17, Y08, E57, R39, N3
 and a large dusky pink Papermania brad was added to the centre and attached to the panel.
 
Highlights were added to the image using the Papermania Snow White gel pen.

Here are the challenges that I shall be entering this card into:

Wednesday, 26 May 2010

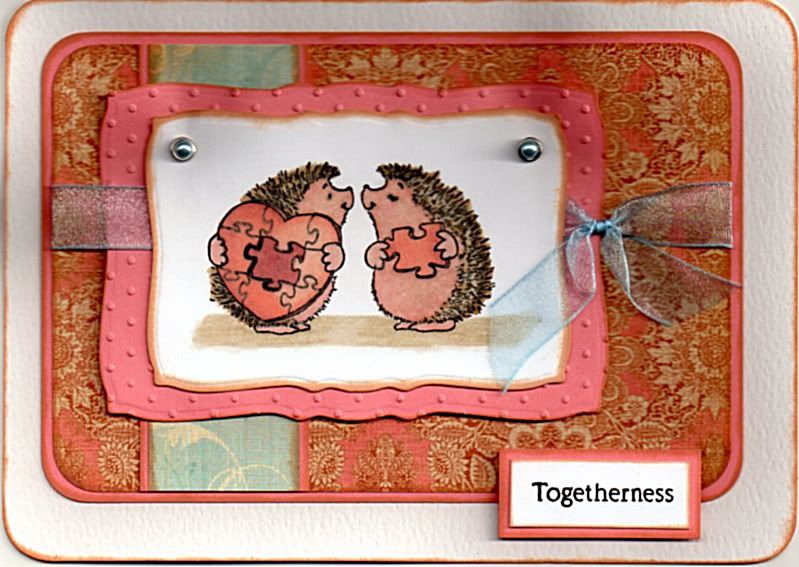
Coral Pink and Blue Jigsaw Piece Hedgehogs Anniversary

This is the card I made for the lovely Alex and her husband for their wedding anniversary recently. I am also entering it into a couple of challenges:

I started by stamping the image from the Penny Black Piece of My Heart stamp set using Versafine Onyx Black archival pigment ink and coloured using the Copic Sketch markers.

  • Hedgehogs: E57, E43, E40, E02, E00, R20

  • Jigsaw: E04, E02, E00, N9

  • Shadow: E43, E40
The image was then cut out using the Mega Curved Rectangles Nestabilities die, and aqua pearl brads from Papermania were added in the top corners.

A panel of the coral pink card was cut out and a panel of the salmon pink Brocade paper from the K&Co Classic K Bailey paper pad was matted onto it. A strip of the light blue Flourish paper from the same paper pad was matted onto the coral pink card and attached across the larger panel.

A panel of the coral pink card was cut out using the Mega Curved Rectangles die and embossed using the Cuttlebug Swiss Dots embossing folder. This was attached to the larger panel and a tied  length of light blue organza ribbon was wrapped around the panel. The image panel was attached over the ribbon.

The sentiment panel was created by stamping the word stamp from the Making Memories Express It stamp set using the Onyx Black ink onto the white card and matted onto the coral pink card.

Saturday, 17 April 2010

Pink and Purple Lacy Chandelier Thank You

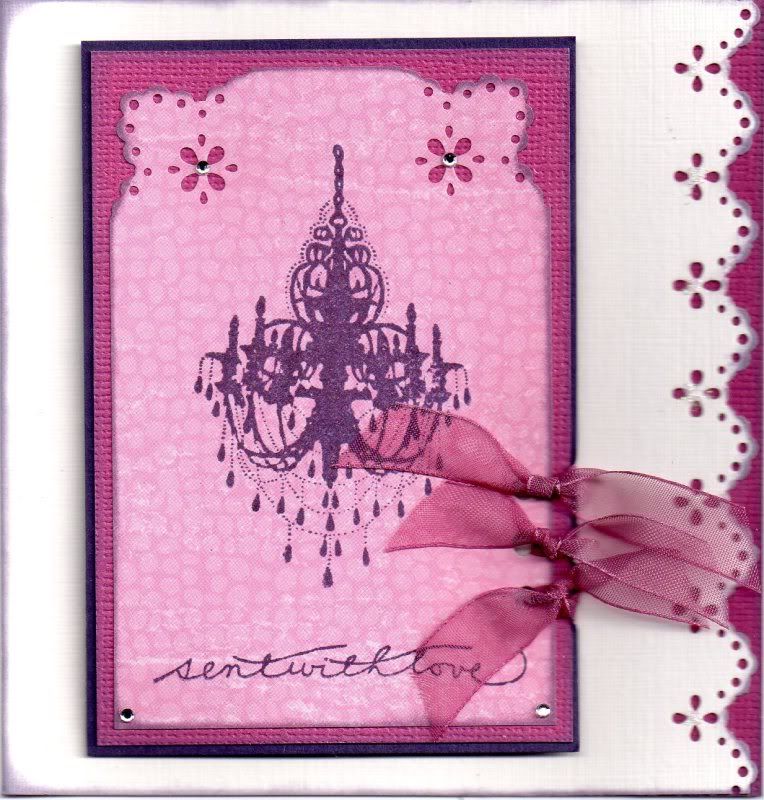
Here is the little Thank You note card that I sent to Alex the other week after I received some goodies from here in her big sell out.

I am entering this card into the Stampin' For The Weekend blog challenge, which currently has a theme of Ribbons & Bows. Hopefully my ribbon knots will qualify!!


I decided to use one of the stamps from my new Papermania Chatsworth Furnishings stamp set. It's a lovely chandelier stamp, and I stamped it using the Versafine Imperial Purple archival pigment ink onto the pink distressed bubble paper from the K&Co The Best Of K&Co Too paper pad. The sentiment, from the Woodware Jane's Script sentiment stamp set, was stamped at the bottom of the panel also using the Imperial Purple ink.
The top corners of the image panel were punched using the Martha Stewart Eyelet Lace corner punch. The edges were then distressed using ColorBox Wisteria Fluid Chalk ink.
This was then matted onto panels of hot pink and purple Core'dinations card. Using the Cropodile Big Bite, holes were punched down the right hand side of the image panel and lengths of Anita's pink organza ribbon were tied through them.
Clear faux gems were then added to the corners of the panel.
To finish off the card, the right-hand edge of the card blank was punched using the Martha Stewart Eyelet Lace border punch and inked with the Wisteria ink. A panel of the hot pink Core'dinations card was then added underneath the punched area allowing the colour to show through.

Monday, 12 April 2010

Blue and Black Sarah Kay Spring Blossoms Easel

This card was inspired by a card that Alex made during a friendly cardmaking get-together at Julie's last year. I've been wanting to have a go at this technique ever since and finally got around to doing it the other day. Hopefully you'll like the results.
You can see Alex's original card here.

I shall be entering these cards into the Cute Card Thursday blog challenge, #107, which has Mono Mania as it theme this week.

I started by stamping the Sarah Kay Spring Blossoms image from Stampavie onto 300gsm watercolour paper using Tim Holtz Faded Jeans Distress ink and the colour was then dragged out using a damp paintbrush. Extra colour was added to areas to add shadow.

The image was cut out using the Mega Rectangles Nestabilities die and the edges were coloured using the Faded Jeans ink and cut and dry foam, leaving the die in place to create a white border.

A larger mat was cut from dusky blue card and the edges colour tinted with ColorBox Charcoal Fluid Chalk ink and stamped with a flourish stamp from the Autumn Leaves Flourish V1 Rhona Farrer stamp set using the Versafine Smokey Grey archival pigment ink.


A panel of blue hessian effect paper from the Hot Off The Press Floral Ultimate Cardmaker's Creative Pack was matted onto a panel of the dusky blue card stamped with the Flourish stamp. A panel of the blue hessian effect flourish paper, from the same paper pad, was matted onto stamped blue card and a length of black sparkle weave ribbon was wrapped around this and matted onto the larger panel.

This was then attached to the easel card and the Sarah Kay image panel was attached onto this.

A circle tag was created from the blue card using the Cuttlebug circle tag and stamped with the Flourish stamp. A white circle to mat on top was cut from the watercolour paper using the Sizzix Sizzlets Circles #4 Frames die. The sentiment was stamped in the centre of the circle using the 'Make A Wish' stamp from the Dovecraft Studio G 'Make A Wish' mini stamp set using the Smokey Grey ink. This was then colour tinted using the Faded Jeans ink and a length of the black ribbon was threaded through the hole and the tag attached to the corner of the image panel.
A touch of sparkle was added to the ribbon and flowers in the image by adding Craft Planet Iridescent Sparkle glitter glue.
To create the stop part of the easel, the blue hessian effect flourish paper was matted onto a panel of the blue stamped card and a length of the black ribbon wrapped around. A sentiment panel was created using the Mega Curved Rectangles Nestabilities die, coloured using the Faded Jeans ink with the die still in place. the sentiment was stamped using the Happy Birthday stamp from the 'Make A Wish' mini stamp set and the Smokey Grey ink.

This was actually the second version of this card that I made. The original version, above, was created without the full front panel, but I decided it needed the panel to make the image stand out more.
Here is the card from the side, showing the construction of the card.

(Apologies for the quality of some of these pictures - they were taken on my camera phone - I really must find my proper camera and USB cable for it).

Thursday, 18 March 2010

First Card Made With My Copics and Creative Card Crew Challenge #46


So, I've had my Copics for a few weeks now and made a few cards with them, but haven't got around to uploading any to my blog as yet, mostly down to all the computer problems I've been having of late.

So, newly returned from a long weekend over in Dublin where I was lucky enough to to go to Croke Park to watch the Six Nations match between Ireland and Wales, I am now ready to let you all see my first Copic efforts.

I was in need of a few men's cards and wanted to use some different stamps. So, I pulled out my Changito stamps that I bought at The Glitter Pot back in 2008 when I visited Alex. I actually made three different versions of this card, but the other versions are currently locked in my old laptop!

So, here is the card I made.
Apologies for the quality of the image, but after 3 months of having my new scanner, I've only just discovered the setting for 'not bleaching out the whole image' so hopefully my newly scanned images will be better!
And here is how I made it:
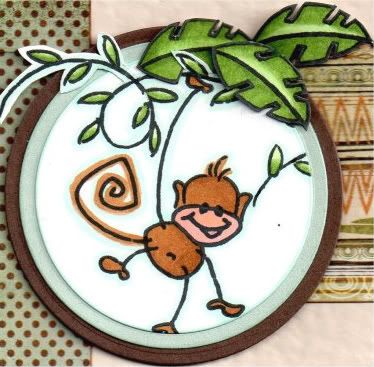
The Vine stamp, from the Stampendous Changito the Monkey stamp set, was stamped using Memento Tuxedo Black ink onto smooth white card, and the Hanging Monkey image stamped next to this. The image was then coloured using a selection of Copic markers (Monkey: E02, E04, E11, E13, E35 and E57; Leaves: YG11, YG17 and YG67; Highlighting: BG11).
The image was then cut to allow the 'out of the box' die-cutting technique using a circle Nestabilities die and then matted onto larger circles of light blue paper and dark brown card.
A strip each of the Primitive and Ancient papers from the Basic Grey Archaic paper pad were then adhered to the front of an A6 cream deckle edged card blank, and the Changito image panel matted over the top.
Additional Jungle Leaves from the same Changito stamp set were stamped and coloured using the same YG Copic markers, cut out, and two leaves were added to the top of the image panel using 3D foam pads. A third leaf was added flat to the card.
The sentiment, from the Hero Arts Birthday Messages stamp set, was stamped using Versafine Onyx Black archival pigment ink in the bottom right hand corner of the card.
The other two versions of this card were more or less the same, but I didn't do the 'out-of-the-box' technique on them, and on one of them I completely coloured around the image with the BG11 Copic marker.
In honour if the fact that this is the first card I have made with my Copics, I have decided to enter this card into the Creative Card Crew blog challenge this week, which is all about Going Dotty.

Friday, 29 January 2010

I've Finally Treated Myself To A Set Of Copics!

I'm sure some of you are aware that I've been talking about treating myself to a set of Copics for the best part of twelve months now. Well, I finally clicked on the 'Confirm Order' button on Tuesday (with much heart pounding and hyperventilating - I don't cope well spending that much money!)

Anyway, I've got a lovely set of 72 Sketch markers (set B) winging their way here, so with a bit of luck I'll actually be able to use them (effectively!)

I've spent the last couple of days watching various Copic Tutorials on YouTube, mostly by a very talented lady who goes by SuzanneJDean. (She also has an amazing blog here). Now of course she uses a different technique to that shown to me by the equally talented Alex, so I'm sure it will take a bit of practice to see which technique works for me.

Now, originally I was going to order my Copics directly from Japan, as they were quite a lot cheaper over there. But, I figured with my luck, I'd get hit by customs so chickened out! I actually bought them from Amazon. Make sure you do your homework though because there's a huge difference in price for the same set of pens depending on where you look online!!

I've managed to print off the Copic Colour Chart in anticipation of my pens arriving. Unfortunately, I don't think they'll be here until next week!! BOO!! :-(

Well, better go and stock up on Memento ink. If anyone can think of anything else I need to 'invest' in, please let me know! (Other than sets A, C and D!)

Monday, 7 December 2009

Pink and Brown Tilda with Watering Can - A Card For Alex

This is the card that I made for Alex's birthday. I find making a card for expert cardmakers quite daunting sometimes but I also enjoy it because I know that they will appreciate the effort you put into them!!

I know that she's opened it now so I can post it on here for you all.


I decided to make a card for her using my new Basic Grey Bittersweet paper pad - these really are beautiful papers!!

The image was very kindly donated by Tara W in an image swap we did last year. The image was watercoloured using Whispers Brushstroke markers and distressed around the edges using the Tim Holtz Frayed Burlap Distress ink. This was then matted onto brown and red card.

A panel of the Cherry Cordial paper from the Basic Grey Bittersweet paper pad was matted onto brown card. A smaller panel of the Truffle paper was matted onto red card and attached onto the Cherry Cordial panel at an angle.

A length of cream lace was coloured with the Frayed Burlap ink to give it a more aged look to fit in with the rest of the card and attached across the two panels.

The sentiment circle, from Aud Designs, was stamped using the Onyx Black ink, coloured using the Whispers Brushstroke markers and distressed around the edges using the Frayed Burlap ink. This was then matted onto brown and red circles cut out using the standard and scalloped circle Nestabilities dies.


The inside of the card was also decorated using a strip of both the Cherry Cordial and Truffle papers. The sentiment, from the Papermania Clare Curd Sentiments stamp set, was stamped using the Versafine Onyx Black archival pigment ink.

I really enjoyed making this card, and thankfully Alex seems to like it! Phew!

Wednesday, 2 September 2009

Purple and Blue Dragonfly Tilda

This is my entry to this weeks 'The Pink Elephant' blog challenge (#30).
This week's challenge consists of a recipe:

1 ribbon
2 squares
something that sparkles

Here is the card I produced:

The Dragonfly Tilda image, from Magnolia, is one that I stamped whilst at Julie's thanks to the lovely Alex.

It was stamped using Versafine Onyx Black archival pigment ink and watercoloured using Whispers Brushstroke markers. The wings were highlighted with Craft Planet Iridescent Sparkle glitter glue. Antennae were added using purple wire from ACE Studio Cards.

A circle of blue paper, cut using a Nestabilities die, was then embossed using the Cuttlebug Swiss Dots folder. This was matted onto a Nestabilities scalloped circle of purple card and highlighted with dots of Craft Planet Ice Blue glitter glue.

A strip of the Jardin paper from the Basic Grey Wisteria paper pad was matted across a square of the White Dynasty paper.

Using the Making Memories Notch and Die tool, two ribbon holes were punched from the scalloped circle and a length of purple metallic ribbon from Dovecraft was threaded through them and attached on the reverse of the White Dynasty paper. This was then matted onto a square of the purple card.

The Tilda image was cut out and layered onto the circles using 3D foam pads.

Purple flower gems, from Papermania, were attached in three of the corners and they were highlighted with the Ice Blue glitter glue, and the floral pattern on the Jardin paper with the Iridescent Sparkle.

The 'Happy Birthday' greeting, from the Hero Arts Birthday Messages stamp set, was stamped in the bottom right-hand corner using Versafine Imperial Purple archival pigment ink.

The inside of the card was also decorated, using the same papers as were used on the front of the card.The sentiment, also from the Hero Arts Birthday Messages stamp set, was stamped using the Imperial Purple ink.

Tuesday, 18 August 2009

A Day At Julie's

Just wanted to let you all know how my day at Julie's went. Early morning (6am!!) and an early train journey into London (or the outskirts at least). I bumped into Alex at the train station as we'd managed somehow to synchronize our arrivals.

After a bit of a chat, and the handing out of goodies, we got underway. Thankfully, they all liked their post-it note holders that I'd made for them (and they didn't fall to pieces in my bag, which I was rather worried about!!). But, I did forget to take a photograph of them, so girls, if you get a chance, please email me a couple of pictures so I can put them on here!

Alex had very kindly given us all one of her little boxes that was filled with chocolate. My dear hubby has been looking at it longingly but I'm blowed if I'm going to let him have them. I might just suck them a little every night so I can taste them but not actually eat them. They should last a while that way too!!! Darn this diabetes!!!

Alex had also assembled a card kit for us all in another beautifully constructed and decorated box. The card was a nice clean and simple design, using the gorgeous Papertrey Ink Damask stamp set (if only they would find a UK distributor/retailer, I'd snap them up in a moment, but with such exorbitant P&P charges, I could never justify the expense).

Anyway, having made my version of the card, I then proceeded to get inky finger prints (Versafine Vintage Sepia) all over it, which I had to disguise when I got home by sponging on the lightest brown colour from the Brilliance Tiramisu ink pad. I also failed to match up the border stamp in the centre of the gatefold!! I really should have a think before I commit anything to paper or card!!

Here is what I managed to create. I don't think it turned out that badly. The card blank was made from brown Kraft card, also available from Papertrey Ink, and brown gems were added to embellish the ornament image.


The second project I attempted was given to us by Julie's friend Lesley. She had prepared a pram template for us all to use, and this time we all managed to make completely different cards. Cutting the template out was the hardest part for some of us (wasn't it "stompy-feet Julie"), but we all produced lovely cards.

Here is my attempt!! I'm not sure what make of papers these are, but I thought they were perfect for a 'just in case' baby card, to keep for when you do need one!!

The Cuttlebug Swiss Dots embossing folder was used on the hood and the Fiskars Apron Lace border punch was used to create the lace trim. Craft Planet yellow glitter glue was added to the dots on the hood and along the top of the paper lace trim. A large Stampin' Up flower punch and a second smaller flower punch were used to create the layered flower in the top corner. The brad was originally pink, so was coloured using a green Copic marker and a blob of the yellow glitter glue.

Buttons from my stash were added to the wheels and the hood (when I got home), after threading them with green embroidery thread.

Alex very kindly did a demonstration of how to use the Copics to their best, so when/if I get around to buying any, I'll have more of an idea of how to get those great effects that so many of you all produce!!!

Also we all had a go at the monochrome look using the Tim Holtz Distress inks on a stamp and dragging the colour out, just as Alex had done on a Sarah Kay card she made last week. I decided to use the technique on one of the lovely house stamps from Papertrey Ink and the Weathered Wood ink. I haven't made the images into cards as yet, but will upload them when I have.

The rest of the day (and somehow there wasn't much more!) was spent stamping up each others various images that we had brought with us. Before we knew it, it was almost 7pm and we had to start tidying everything away.

Amazingly, that didn't take as long as we had anticipated, so we made our way back to the train station. We said our goodbyes (reluctantly) and headed off home. It was 10.45pm when I got home and was pretty bushed, but it was all worth it for an amazing day spent with friends - 'cos that's what you are girls!!! I never thought that two very special friends could be made through a forum, but they can and you are the proof!! Hopefully my move up north won't spell the end of our get-togethers. We'll have to figure a way around that! Not sure how big my new house is going to be, but maybe a weekend in Lincolnshire is on the cards.

Well, enough of all this soppy-ness! Hopefully I'll get around to uploading a few more cards tomorrow. Not sure which ones though. I'm still a bit behind on my uploads, so I might add a few of the anniversary cards I've been making.

Friday, 14 August 2009

Weekend Get-Together

OK - so I haven't uploaded the men's cards, but I've been far to busy. You see, I'm meeting up with a couple of friends from the docrafts forum on Saturday and I wanted to make them each a little gift, so I've been busy beavering away making them. I'll try and either scan them in or take some photos and upload the pictures next week (assuming I can find the cable to connect the camera to the laptop!!)

I'm really excited to see Jules and Alex again, and a friend of Jules is also coming along so I look forward to meeting her too.

This will also be my first post-diabetes solo trip so a bit nervous about that aspect of things, but I shall have my insulin and a snack with me to make sure I'm OK.

Well, got to go and put the finishing touches to my little gifts, then off to bed. Need to decide what stash to take with me and see if I can find my little cutting mat. I think it's in a box somewhere!!!

Friday, 29 May 2009

DIY Marshmallow Fathers Day - Alex K's Blog Candy Challenge - CLOSED

Why is it when you really want to get down to some cardmaking there's always something getting in your way!

I wanted to get my entry for Alex's blog candy challenge out of the way about a fortnight ago, but what with one thing and another it didn't happen. Then, on Monday I said to myself I'd get it made on Tuesday, so of course I spent all day in bed with a migraine. I haven't had one for a long time, and this was a particularly nasty one. Not only that, but my eyesight seems to be getting worse just lately, so I'm going to have to dig my glasses out more often.


The blog candy up for grabs is amazing!!!!

Here is what the lucky recipient will receive from the very generous Alex:

- A set of Nestabilities - large plain Octagons
- A packet of designer Gromlets from We Are Memory Keepers
- 5 pink glittery cards with envelopes
- A pack of flower shapes
- A 2"x12" Papermania Oriental Spice Border pack
- 24 A4 sheets from the new Papermania Signature ranges Blueberry Hill and Regency (12 each)
- 20 6"x6" sheets of Core'dinations Whitewash cardstock
- 1 Autumn Leaves Butterfly stamp
- 4 reels of American Crafts Ribbon
- Bottle of Silver Metallic 3D paint
- A wallet with Hanglar images

Anyway, I finally managed to get the card made yesterday. The sketch that Alex produced for the challenge looked particularly 'girlie' with the flowers on it, but I decided to adapt it to a masculine card, mainly because I had to make my Father's Day cards earlier than normal as my father-in-law is going on holiday at the start of June so I've got to get it to him before he leaves.


Anyway, I hope you don't think I've taken too many liberties with the sketch!!!

I started by stamping the Marshmallow DIY image from the Marshmallow Does DIY stamp set from Daisy and Dandelion using the Versafine Onyx Black archival pigment ink and watercoloured it using the ColorBox Amber Clay and Chestnut Roan fluid chalk inks.


The 'Warning' tag image was also stamped using the Onyx Black ink and watercoloured with the Amber Clay ink and a small length of Anita's tan leather sticky ribbon was threaded through the tag. The toolbox image was also stamped and coloured as for the other images.


The edges of the Marshmallow image panel, as well as all the other panels, were coloured using the Amber Clay and Chestnut Roan fluid chalk inks, and matted onto beige textured cardstock.


Two matching papers from the Daisy and Dandelion Picnic Patch paper pad were matted onto another piece of the beige card and a length of the tan leather sticky ribbon was adhered onto a strip of the beige card and then attached across the join of the patterned papers.


The Circle Journalling image from the Studio G Mini Journalling Blocks stamp set was stamped onto white card using the Onyx Black ink and the 'Best Wishes' sentiment from the Papermania Clare Curd Sentiments set was stamped within it. This was then watercoloured using the Amber Clay ink. Silver embroidery thread was tied through a hole made through the top of the circle and threaded under the leather ribbon and through to the back of the panel. A mini silver brad was pushed through the hole in the panel to make it look like the brad was holding the sentiment in place.


The 'Warning' tag and toolbox images were then adhered over the edges of the Marshmallow image panel.

I decorated the inside of the card with a strip of the striped paper as used on the front of the card and stamped the sentiment using a 'Happy Father's Day' stamp from Inca.


I also made a 'Handmade By' medallion for the reverse of the card.

Watercolouring with the fluid chalk inks is a bit of trial and error. You need to add quite a lot of water so you don't get too thick a colour as they can obliterate the stamped lines, as you can see below on the second Father's Day card I made.


This was made almost the same as the challenge card, but on this one I added the 'Warning' tag to the Marshmallow image panel and added the word 'DAD' down the right-hand side.

This was done by stamping the letters from the Papermania Fun Letters stamp set onto both the striped paper and the beige texture cardstock.

The patterned letters were stamped using the Onyx Black ink and cut out close to the outline and the cardstock letters were stamped using both the Amber Clay and Chestnut Roan chalk inks and layered up.

The screwhead image from the Marshmallow Does DIY stamp set was then stamped onto the letters and traced over with an orange Sakura metallic gel pen.

Tuesday, 9 December 2008

A birthday card for Alex (Eisbaerin)

Here is the birthday card that I made for Alex (Eisbaerin) for her birthday on Sunday. It sounds like she had a lovely day!!

I made the card to double as a wallet card as I wanted to reciprocate all the lovely images she has sent me over the past few months. I haven't made up for everything but I hope it goes someway to say thank you!!!

The image is a cute little Docrafts stamp, which I coloured with Whispers Brushstroke markers and a green Impress re-inker.

The little tag was 3D'd to add dimension, and the mouse image was matted onto lime green card from the DCWV Brights cardstack.

The patterned papers are from the K&Co Amy Butler Belle paper pad, and a length of green organza ribbon was attached across the pieces of paper and a knot was added.

The sentiment was stamped using one of the circles from the HOTP Sentiments set and also matted onto lime green DCWV card, cut using the Fiskars Shapecutter and circles template. A small piece of ribbon was attached to it to make it look like it is hanging.

A lime green Papermania brad was attached through a pink paper flower from Crafty Cow and attached over the corner of the image.

Thursday, 13 November 2008

A Great Day of Stamping, Crafting and Making Friends

I meant to post this on Sunday but I had great problems with my Internet connection, and then I've just not had a chance to sit down and get on with it since.


Anyway, I'm talking about last Saturday - although the day actually started on the Friday as I didn't sleep at all on Friday night (believe me, this took its toll later on in the day!!)

I was up at 5.45am (I didn't realize there WERE two 5.45's in the day!), showered, dressed and in the car and heading for Newbury train station by 6.45am. I was on my first train at 7.05am and on my way to West Sussex. I only had one problem with the trains -probably due to the wrong sort of rain on the line, so missed my connection at Redhill, but thankfully I eventually arrived at Haywards Heath just 30 minutes later than anticipated.


There I was met by the lovely Alex (I sort of recognized her from her blog picture and was hoping I wasn't smiling like a mad person at a complete stranger!!) and from there we headed to the Glitter Pot where we met up with Julie and Sarah, who had made the trip from London and Surrey respectively. Michelle Saxon was there demonstrating the BIA and the Dreamkuts, and we all took notes as we all wanted to have a play with the BIA later on in the day. Having spent far too much money in The Glitterpot, we then headed off to Alex's house for an afternoon of crafting.


We all decided to get lunch out of the way, but not before some great gifts were exchanged. Alex gave us all some wonderful hand-made goody bags, each containing a lovely calendar, some stamped images from the new Magnolia Christmas collection, and some beautiful papers. Julie had made us all a lovely book of papers, made with her BIA,


here is the book she gave to me:


and Sarah gave us all a box of Belgian Praline chocolates (one of my favourites!)


After lunch, we decided to make the most of Alex's graphic design background and get her to give us all a crash course on using the Copic Markers. When used properly, the effects really are amazing. The colours are so vibrant and they blend beautifully - but, only when done properly!! I think I'd want to practise a bit more before I committed to spending all that money on them.


After our colouring lesson, we all took advantage of Alex's amazing collection of stamps and started stamping some images out. This was accompanied by a delicious Donauwellen cake that Alex had made herself, and reminded me of 'Kaffee and Kuchen' when I lived in Germany. I love all those rich German cakes and this was no exception.


Then, with the exception of Julie who made a start on her calendar, we all started to make mini books following the instructions given by Michelle Saxon earlier in the day (although of course there's always one person who manages to mess their design up completely due to not paying attention - stop pointing fingers at me!! :}).


At about 5pm, my eyes started to get very sore and itchy, no doubt a result of the fact that I hadn't slept the night before!!


Unfortunately, the day had to come to an end. Julie and Sarah bid their farewells at 6pm and headed home. I stayed a bit later as my train wasn't until 7.30pm. Alex dropped me off at the train station and we both expressed our hopes that we'd be able to do this all again!! I have to admit I really enjoyed the day and would love to do it all again, but it was a very long and tiring day!!


Thankfully all my trains were on time on the way home. I almost missed getting off the train at Gatwick but realized just in time where I was and managed to jump off. I didn't fall asleep at all on the journey home amazingly, and was picked up from Newbury station by my lovely hubby at 10.20pm.

If I ever manage to sort out my mini book I'll post a picture of it on here for you.

Tuesday, 7 October 2008

Lovely Card From Alex

Just wanted to show the world this lovely card that I received from the great Alex. She has just set up her own blog (FINALLY!!!) and I know that I shall look forward to how it develops.

The card was part of an image swap. I am as yet to reciprocate but I'm working on the 'it'll be a surprise when she gets it' theory!!! Alex sent me some great images from the Heavenly and School Tilda and Edwin collections. I'm really looking forward to using them.
I love the paper-piecing that Alex has done, and love the embossing - I'm definitely putting the Big Shot and some embossing folders on my Christmas list.
Blog Widget by LinkWithin