Pages

WELCOME

This blog was created to act as a record of the cards and other projects that I have made. It is for both my own reference and to help inspire anyone who wants to take a look.

I'd love it if you'd leave me a comment so that I know what you think of my projects and that you've been to visit!

Anyone can comment, even those who don't have a blog. (Just look for the word 'Comments' under the three little pictures at the end of each post). Readers without a blog can add an anonymous comment, but please leave your name (and docrafts username if applicable) so I know who you are!

Slideshows of all the cards I've uploaded to my blog can be found at the bottom of the page.


PEOPLE WHO FOLLOW MY BLOG

Showing posts with label Shapecutter. Show all posts

Monday, 31 August 2009

Coral Pink Tingla New Baby Girl

Whilst 'blurfing' over on Tara's blog Happily Ever Crafting, I saw some links to some new challenge blogs (well, new to me, anyway). I've added links to them on my sidebar if you're interested.

One of the blogs, Stampin' For The Weekend, has a challenge to make an 'Anything Baby' card. It was then that I realized that I had never uploaded the New Baby Girl card I made for my cousin and his wifewhen their baby Evie Grace was born. I figured it was perfect for the challenge.

So, here's the card I made:

The image is one that I stamped during my trip down to West Sussex last November down at Alex's.

Baby Tingla was watercoloured using Whispers Brushstroke markers, cut out and highlighted with Sakura clear gel pen and Craft Planet Green glitter glue.

The 'It's A Girl' circle sentiment from Aud Designs was stamped and watercoloured using the Whispers Brushstroke markers and highlighted using Sakura clear glaze pen.

The patterned papers are from the DCWV Nana's Nursery It's A Girl paper stack and were matted onto coral card.

Ovals were cut from matching paper and white card using the Fiskars Shapecutter, and the scalloped circle was cut using PI scallop decorative scissors.

Paper Prima flowers were attached in the bottom right hand corner and self-adhesive pearls were added in their centres. I changed the colour of one of the flowers by colouring the petal tips and the centre with Whispers Brushstroke markers and then flooding each petal with water to make the pigments run. Once dry, the petals were re-shaped using an embossing tool and one of the mini purple stamping mats from See D.

Saturday, 18 April 2009

Chocolate Orange Medallion - Basic Grey Challenge #30

Well, I've done it again. Slaved over a card for a blog challenge only to miss the deadline. I wouldn't mind, but I had made it in time, just didn't get round to uploading it to my blog!!!
Anyway, I've got round to it now, so here it is - or should I say, they are. I made one, and wasn't 100% happy with it, so decided to make a second version. Let me know which one you prefer!

For a change, the card blank is a side opening A6 card.
The image, from the Lakeland set of small medallion stamps, was stamped onto smooth white card using Ink It Up! Light Chocolate pigment ink and then clear embossed. The panel was then colour tinted with Tim Holtz Spiced Marmalade Distress ink. The image panel was then matted onto brown card and paper, and a small orange brad was added to the centre.

Strips of three co-ordinating papers from the Basic Grey Sugared paper pad were colour tinted with the Tim Holtz Spiced Marmalade Distress ink, and the same ink was used to repeatedly stamp the medallion image on the brown strip. The paper strips were then matted onto brown paper. A further strip of paper was cut using the Fiskars Shapecutter and the small scalloped edge of the Fiskars Circles template. A sentiment from the Hero Arts Birthday Messages set was double stamped on this strip with the Whispers Barn Brown permanent dye ink and the Tim Holtz Spiced Marmalade Distress ink.

Little dots were added along the edges of each of the brown panels and to highlight the dots already on the medallion images.

The second version of the card isn't that dissimilar.

The main differences are that I added the scalloped strip to the vertical brown strip and stamped the medallions on it in the Whispers Barn Brown permanent dye ink.
I added the sentiment to a shorter panel of the scalloped strip, and traced over the lettering with the orange metallic Sakura gel pen.
I also decorated the inside of the cards,
and added my 'Handmade By' medallions to the reverse of the cards.

Tuesday, 9 December 2008

A birthday card for Alex (Eisbaerin)

Here is the birthday card that I made for Alex (Eisbaerin) for her birthday on Sunday. It sounds like she had a lovely day!!

I made the card to double as a wallet card as I wanted to reciprocate all the lovely images she has sent me over the past few months. I haven't made up for everything but I hope it goes someway to say thank you!!!

The image is a cute little Docrafts stamp, which I coloured with Whispers Brushstroke markers and a green Impress re-inker.

The little tag was 3D'd to add dimension, and the mouse image was matted onto lime green card from the DCWV Brights cardstack.

The patterned papers are from the K&Co Amy Butler Belle paper pad, and a length of green organza ribbon was attached across the pieces of paper and a knot was added.

The sentiment was stamped using one of the circles from the HOTP Sentiments set and also matted onto lime green DCWV card, cut using the Fiskars Shapecutter and circles template. A small piece of ribbon was attached to it to make it look like it is hanging.

A lime green Papermania brad was attached through a pink paper flower from Crafty Cow and attached over the corner of the image.

A couple of Penny Black Christmas Cards

I'm starting to get very worried now that I'm not going to get my Christmas cards finished in time to post them!! I've got about 35 still to make. I managed to miss the last posting date to Australia, but hopefully I'll meet the US/Canada one on Wednesday!

I managed to get another couple of cards made today, using a couple of Penny Black images that I received in an image swap from Judith B over on the docrafts forum.

The first is using the ice skating Hedgie from the Penny Black Christmas Critters set. The image was watercoloured using Whispers Brushstroke markers and the hat highlighted with Anita's Metallic White 3D Dimensional paint.

The image was then placed beneath a slide mount covered with patterned paper from the HOTP Christmas Creative pack, as was the mini tag.

The greeting was taken from the HOTP Christmas Motifs stamp set, stamped using Versafine Onyx Black ink and cut out and matted onto the tag.

Red patterned paper from the HOTP Christmas Creative pack was matted onto gold mirror card as was a matching piece of green paper from the paper pack.

Red embroidery thread was threaded through the tag and attached in the corner of the card.

The second is using another Penny Black image from the Christmas Critter set, this time the Carol Singing Mice.
The image was watercoloured using Whispers Brushstroke markers and highlighted with clear Sakura Glaze pen on the lantern and clear Sakura Stardust pen on the gloves and scarf.

A frame was created from dark green card using the Fiskars Shapecutter and the Frames#1 template.

The patterned papers are from the HOTP Christmas Creative pack, and matted onto gold mirror card.

The greeting panel was cut out using the HOTP Labels template, and stamped using Brilliance Rocket Red ink and a greeting stamp from the Dovecraft Studio G Snow Phrases mini stamp set. The snowflakes were taken from the HOTP Christmas Motifs set. The greeting panel was then matted onto a shape cut out using the HOTP Tags template.

Small clear faux gems were adhered to the corners of the frame and to the centres of the snowflakes.

Monday, 20 October 2008

Cards Made For My Friend - Hen Party and Wedding Card

My friend asked me if I could make her a couple of cards and I jumped at the chance.

She wanted a 'Hen Party' card and a wedding card with a Winter Wonderland theme, with a colour scheme of white, silver and teal.

The Hen Party card was easy enough - a learner plate, some marabou feathers, some decorative ribbon and a crystal star gem.

I cut the letter 'L' from some read card and mounted it onto white card and added a Papermania crystal star gem to the corner.

A rectangle of cerise card was matted onto silver Constellation Shantung card, and a couple of white marabou feathers were attached below the letter panel.

The words 'Hen Party' were stamped below the letter panel using a set of the Studio G mini alphabet stamps and the Brilliance Starlight Silver ink.

A length of decorative ribbon was attached down the middle of a small tall card blank and the panel was attached over the top.

The wedding card was another story. I was trying to decide on a style and decided to adapt the design of the Summery Tilda card.

The Papermania Decorative Heart image was stamped in Metallic Silver Ink It Up! pigment ink and embossed using Personal Impressions Turquoise Sparkle embossing powder. This was cut out and watercoloured using Whispers Brushstroke markers. The image was then attached onto layered ovals cut out from teal card and Anita's Classic Silver Christmas vellum.
Two corners of a matching sheet of the vellum were stamped using one of the small Docrafts Ornate Corner stamps and ColorBox Prussian Blue Fluid Chalk ink, and embossed using clear powder. The corners were then coloured from the reverse using a metallic permanent pen and a white souffle pen.

A patterned paper from the HOTP Earth's Palette Creative paper pack was cut using the Fiskars Shapecutter and circle template. This was then stamped using the small flourish morsel stamp from the See D's Connectors Collection set, and a small snowflake stamp from the HOTP Snowflake set of stamps. These were stamped using Brilliance Moonlight White ink, and the 'True Love' sentiment was stamped using a stamp from the Making Memories 'Express It' stamp set and Marvy Matchables Turquoise dye ink, and overwritten with a clear Stardust pen.

A patterned paper from the Dovecraft Christmas Blues designer paper pack was also cut and both pieces were layered up with the stamped vellum and a piece of teal cardstock. A length of white lace was attached across this using small white Papermania brads, and the heart panel was attached over the lace.

Turquoise Papermania adhesive pearls were then added to the heart image, and to the stamped corners.

Wednesday, 15 October 2008

Summery Tilda for a Friend

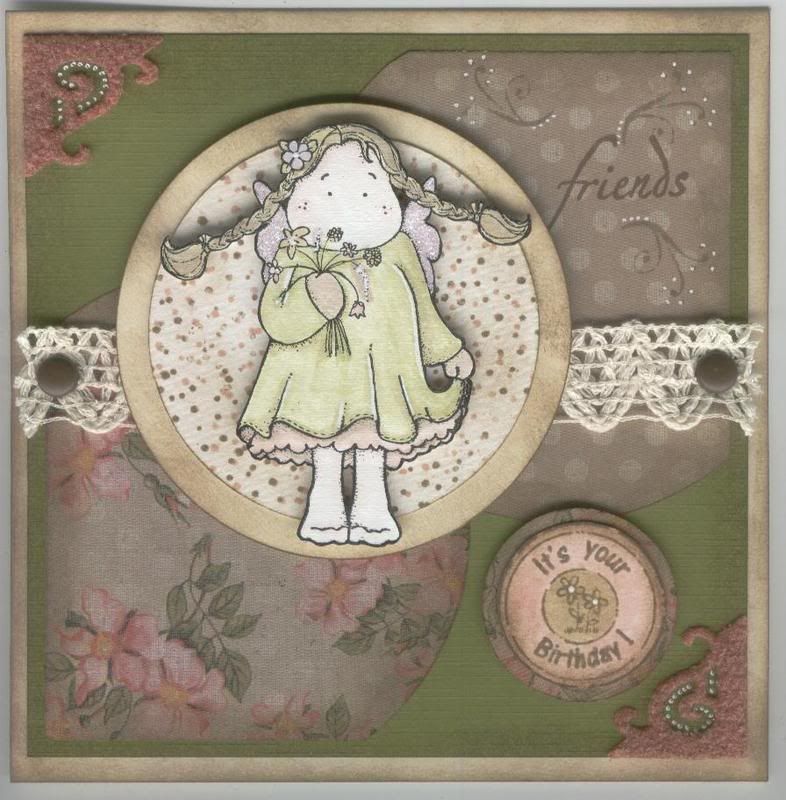
Here is my entry for this weeks Stamp Something blog challenge. The theme for this week is 'Stamp Something For A Friend'. I needed to make a card for my friend Simone - the mum of the little boy I made the robot card for, so decided this was the perfect challenge for the project.

As I said, her birthday is the same day as mine (29th Dec), and I've been busy trying to get all my birthday and anniversary cards for December and January finished so I can make a start on my Christmas cards (think this is the latest I will have ever started them!!) and not have to worry about not having any cards to send when I get back from the in-laws after New Year.

So, my method for this card began with picking the papers and then colouring the image in to match. I decided to try and colour with the Distress Inks (Frayed Burlap, Scattered Straw, Tattered Rose, Shabby Shutters and Milled Lavender) - not sure if the effect is as good as with the Whispers Brushstroke markers! Highlights were added using a white gel pen and Craft Planet Irridescent Sparkle glitter glue was added to the wings

Having coloured the image I then decided on the layout. This one just kind of evolved. I cut the shapes from the HOTP Pretty Cardmakers Creative pack papers using the Shapecutter and circle template. I distressed the edges using the Frayed Burlap distress ink and some Cut 'n' Dry foam. I attached these to a piece of equally distressed olive card from the Papermania textured cardstock pack.

I wanted to add some fancy corners, so cut some Vivelle using the Ellison Photo Corners die cut, and added some of the Frayed Burlap ink to tone down the brightness of the colour. Highlights were added using a white gel pen.

A length of cream crochet trim was attached across the card using large brown Papermania brads.

Small flourishes were stamped using a morsel stamp from the See D's Connectors Collection set and the Frayed Burlap distress ink and embellished using a white gel pen. The word friends was selectively inked from a stamp in the Clear Choice! Butterflies and Dragonflies set using ColorBox Chestnut Roan Fluid Chalk ink.

The greeting was stamped using one of the Aud Designs circle greetings stamps and the Frayed Burlap distress ink. It was then coloured using the Frayed Burlap, Tattered Rose and Shabby Shutters distress inks, and highlighted with a white gel pen. This wasa cut out and added to a circle of the floral patterned paper.

Two circle mats were cut out using the Shapecutter and circle template. These were both distressed and the white circle was stamped using one of the spotty background stamps from the See D's Mini Deco Backgrounds set using the Frayed Burlap and Tattered Rose distress inks.Tilda was cut out and matted onto the circles.

I must confess that I rather like this card and am pleased that it will be making its way to Australia in December.

Sunday, 28 September 2008

Jewels and Tilda - what more could you want???

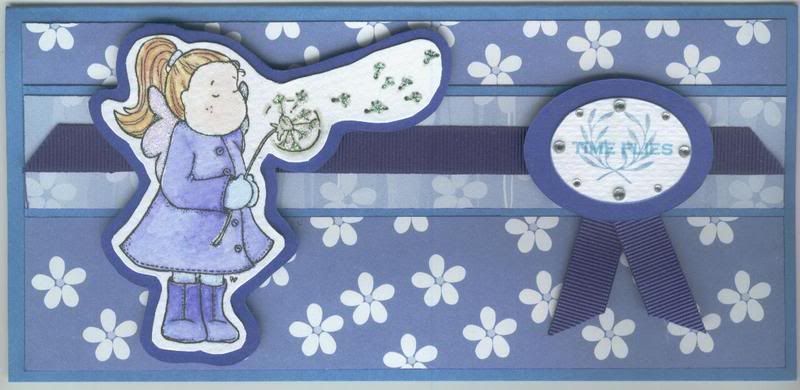
Here is my entry to this week's ABC Challenge. The challenge this week is 'J is for Jewels'.

The card is actually a wallet card for a fellow docrafts member (hopefully Carla/Little Miss Naughty isn't peeking or she'll spoil the surprise!) as we agreed to an image swap. She very kindly sent me some masculine stamped images and I am returning the favour with some Tildas and Kerry Jos.

The card consists of a sheet of A4 card divided into 3, with the 3rd section trimmed to create a flap inside the card to hold the stamped images.

The 'Tilda with Dandelion' image was stamped using Versafine Onyx Black ink and watercoloured using Whispers Brushstroke markers. The wings and dandelion were then highlighted with Craft Planet Iridescent Sparkle glitter glue. The image was then cut out and mounted onto a piece of royal blue card and cut out again leaving a small border.

Hopefully this will not only fulfill the criteria for the challenge but Carla will also like the card.
Two ovals were cut out using the Fiskars ovals template and Shapecutter. The sentiment was stamped onto the white oval using the 'Time Flies' stamp from the Making Memories 'Express It' set and the wreath flourish was stamped over the top of the sentiment using the stamp from the Making Memories 'Ornaments' set.

Clear crystal gems were added around the edge of the sentiment oval, and royal blue grosgrain ribbon was added to create tails to the back of the oval medallion.

Large blue flower paper from the Papermania Citrus Colossal paper pack was attached to the card blank, and a strip of the large blue flower and stripe paper from the Papermania Pastel paper pack was matted over the top, having been matted onto blue card. A length of the royal blue grosgrain ribbon was attached along this strip.

Saturday, 27 September 2008

Budget Tilda with Dandelion Card

The challenge over on the Tilda and Co Blog Challenge this week is to make a card on a budget of less than £1.

I had a wallet card to make for my Docrafts Image Swap for September so decided to try and fulfil the criteria with this one.

The wallet card was made according to the instructions over on Katharina's blog, but slightly adjusted to give it a spine to accommodate the stamped images.
The 'Tilda with Dandelion' image was stamped using Versafine Onyx Black ink and watercoloured using Whispers Brushstroke markers. The wings and dandelion were highlighted with Craft Planet Iridescent Sparkle glitter glue. Whispers Azure Seas permanent ink was sponged around the Tilda image.

The dots from the 'A Little Something' stamp were selectively inked using the markers, cut out and matted onto a larger circle that was cut out using the Fiskars circles template and Shapecutter.

The sentiment was stamped using the 'Time Flies' stamp from the Making Memories 'Express It' set and the flourish was stamped over the sentiment using from Making Memories 'Ornaments' set.

Clear crystal gems were added around circle, at the corners of the Tilda panel and on Tilda's hairband.

To make up the wallet card, a strip of blue mini daisy paper from the Papermania Citrus paper pack was attached down the centre of the front, having been matted onto a piece of royal blue card.

Royal blue grosgrain ribbon was attached around the wallet card to enable it to be tied up.

Shopping List:

Card blank: box of card from Papermill Shop = £6.99/250 sheets - 1 sheet used = 2.8p
Other card (white and blue): as above - 1/2 sheet card total = 1.25p
Patterned paper: £7.99 for 100 sheets = 7.99p/sheet - 1/4 sheet paper total = 2p
Glitter glue: £1.99 for 120ml = 1.66p/ml =1p
Gems: £2.79 for 1500 = 0.19p each - 8 x0.19=1.5p
Ribbon: 20p/m - 0.5m used = 10p

Total cost: 18.55p

Tuesday, 23 September 2008

Tartan Sheep Birthday

This is my entry for this week's Sketch Saturday blog challenge.

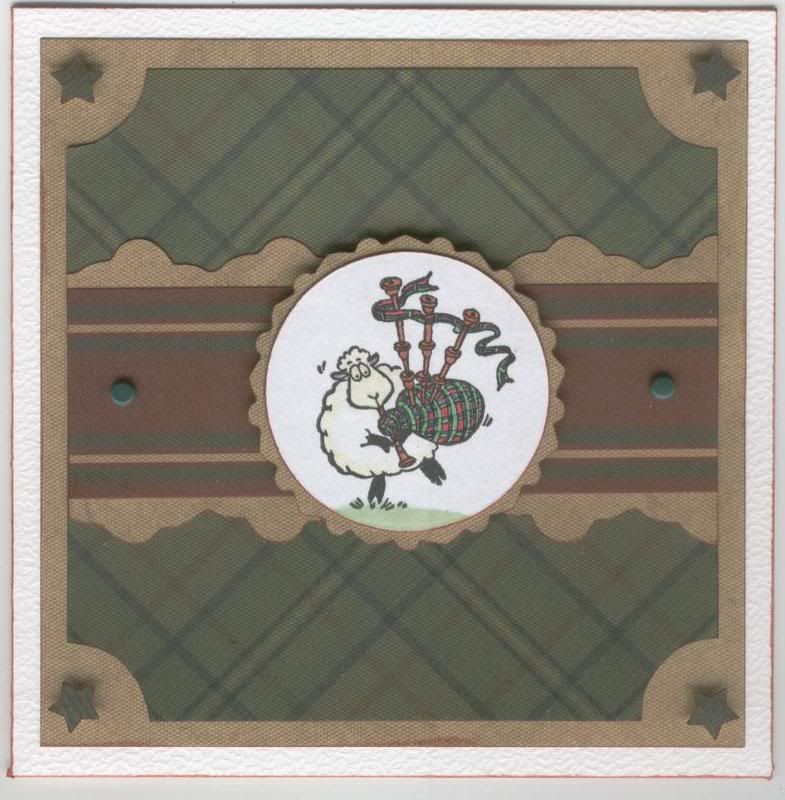
I decided to use one of my new Penny Black Twelve Days Of Christmas stamps, but without the sentiment. I still haven't decided whether to add a birthday sentiment to it yet or leave it as it is.

The image was coloured using Whispers Brushstroke markers and cut into a circle with the Fiskars Shapecutter. The larger circle was cut from the beige texture paper from the K&Co Hampton paper pad using Personal Impressions decorative scissors.

The strip of papers were cut from matching papers, the beige texture paper cut using the edge of the Fiskars Frames template and the Fiskars Shapecutter. Punched stars were 3D'd in the corners and a couple of green brads were added to the paper strip.

Here is the original sketch:
Blog Widget by LinkWithin
