Pages

WELCOME

This blog was created to act as a record of the cards and other projects that I have made. It is for both my own reference and to help inspire anyone who wants to take a look.

I'd love it if you'd leave me a comment so that I know what you think of my projects and that you've been to visit!

Anyone can comment, even those who don't have a blog. (Just look for the word 'Comments' under the three little pictures at the end of each post). Readers without a blog can add an anonymous comment, but please leave your name (and docrafts username if applicable) so I know who you are!

Slideshows of all the cards I've uploaded to my blog can be found at the bottom of the page.


PEOPLE WHO FOLLOW MY BLOG

Friday, 24 April 2009

Pink, Black and White Love Birds - Colour Create #12

Here is my entry for this week's Colour Create blog challenge. I'm ashamed to say that this is my first entry to this challenge, especially as it is run by some good pals from the docrafts forum!!

But, as they say, better late than never, and hopefully this will be the first of many entries. (I might even go back and make up some cards for the earlier challenges if I get a chance!)

Anyway, here's the card. This week's challenge was to incorporate pink, black and white with the added option of including polka dots. I decided to make an anniversary card.

Firstly, the Love Birds image from the Papermania Sweet Nothings stamp set and the frame image from the Papermania Spring Burst stamp set were stamped onto the reverse of white hammer card using Versafine Onyx Black archival pigment ink and cut out. Both images were stamped out again onto pink card and again cut out.

The daisy background stamp from the Papermania Secret Garden stamp set was used to stamp a background onto the frame using Ink It Up! Pink pigment ink.

Strips of black and white paper were matted onto the pink and white heart paper from the Papermania Scrumptious paper pad and a length of Anita's self-adhesive black and white polka dot ribbon was adhered on top. This panel was then matted onto black and white paper, and attached to the front of a square pink card blank. The Love Bird panel was attached over the ribbon on 3D foam.

A rub-on from the Royal and Langnickel Friends Sentiments sheet was added to the bottom of the hearts panel, along with stamped parentheses and clear faux gems.

Wednesday, 22 April 2009

"Awesome" new site for tutorial videos

I happened across this site following a recommendation over on the Splitcoaststampers forum.

The site is the creation of Ann Clemmer. The video that was recommended was one for making your own mock-croc background paper.

I was only thinking the other day that it would be good if Cuttlebug made an embossing folder to create this look, but I love the technique shown on this video. I highly recommend it!

You can see the card that Ann created using this technique here.

Monday, 20 April 2009

Blue, Green and Yellow Nellie with Spring Flower

Here is my entry for this week's Stamp Something blog challenge. The theme for this challenge is a colour one - blue, green and yellow.

The Nellie with Spring Flower image by Sugar Nellie was kindly donated by Alex K.

The image was watercoloured using the Whispers Brushstroke markers and the blender pen. This was matted onto green paper and blue card. The blue flower and stripe paper from the Papermania Venetian Skies Creative Tones paper pad was matted onto the card blank and a strip of the outline flower paper from the same paper pad was watercoloured and matted onto it.
The journalling panel from the Papermania Sweet Nothings stamp set was stamped using Versafine Onyx Black Archival pigment ink, and watercoloured. The hearts were then highlighted with Glitz It Pear Green glitter glue and the sentiment was stamped onto the journalling panel using Versafine Spanish Moss Archival pigment ink. This was also matted onto the green paper and blue card.

The Pear Green glitter glue was added to the coloured flowers on the paper strip as well as the flower on the image panel.

Paper flowers (green from The Crafty Cow and Faded Jeans Blue from Papermania Imaginisce), were adhered to the top corner and Patti's Pretties (glass pebbles) were added to their centres.

I also decorated the inside of the cards, using a strip of the blue flower and stripe paper and the watercoloured outline flower paper as used on the front of the card.

The sentiment was stamped using the 'Happy Birthday' stamp from the Hero Arts Birthday Messages stamp set and ColorBox Prussian Blue Fluid Chalk ink.

Saturday, 18 April 2009

Green Classical Face and Flourishes

This card was inspired by a card in Craft Stamper magazine, and also by Jules B's take on it.

The face image, from the Non Sequitur Memories of Italy stamp set, was stamped onto the card blank using Versfine Onyx Black pigment ink.
A circle of matching card was coloured using Tim Holtz Shabby Shutters Distress ink and edged with ColorBox Amber Clay Fluid Chalk ink. The image was then stamped onto it, and the circle was attached onto the card over the top of the first image.
A flourish from the Autumn Leaves Rhona Farrer Flourishes v.2 stamp set were stamped directly onto the card blank, as was the word, which was taken from the Clear Choice! Butterflies stamp set.

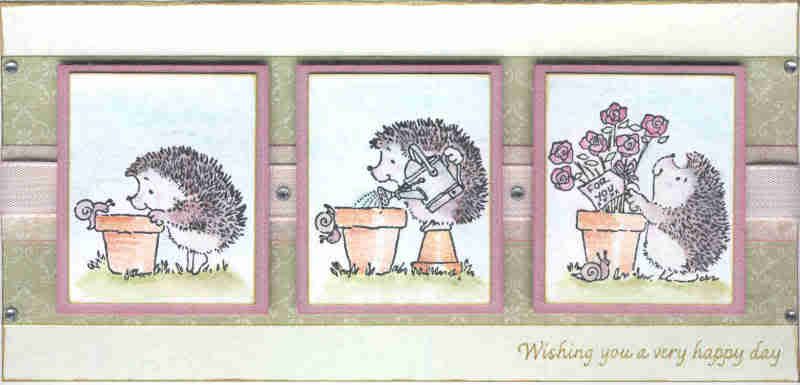
Pink and Green Gardening Hedgies

Here is my entry for this week's Papertake Weekly blog challenge, the theme for which is pastel colours. You can see the Design Team's take on this challenge here, along with the links to the other entries.
The Penny Black image was watercoloured using the Whispers Brushstroke markers. The images were cut up and matted onto pink card.

Patterned papers from the HOTP Floral Ultimate Creative Pack were matted onto a pale green card blank with a length of pink woven ribbon wrapped around them.

Clear faux gems were added to the corners of the patterned paper and between the images.

The sentiment was taken from the See D's Celebration Messages stamp set and stamped with ColorBox Olive Green Fluid Chalk ink.
I decided to decorate the inside of the card using the patterned papers and pink card used on the front, and the Happy Birthday stamp from the See D's Celebration Messages stamp set and the Marvy Matchables Jungle Green dye ink.

Chocolate Orange Medallion - Basic Grey Challenge #30

Well, I've done it again. Slaved over a card for a blog challenge only to miss the deadline. I wouldn't mind, but I had made it in time, just didn't get round to uploading it to my blog!!!
Anyway, I've got round to it now, so here it is - or should I say, they are. I made one, and wasn't 100% happy with it, so decided to make a second version. Let me know which one you prefer!

For a change, the card blank is a side opening A6 card.
The image, from the Lakeland set of small medallion stamps, was stamped onto smooth white card using Ink It Up! Light Chocolate pigment ink and then clear embossed. The panel was then colour tinted with Tim Holtz Spiced Marmalade Distress ink. The image panel was then matted onto brown card and paper, and a small orange brad was added to the centre.

Strips of three co-ordinating papers from the Basic Grey Sugared paper pad were colour tinted with the Tim Holtz Spiced Marmalade Distress ink, and the same ink was used to repeatedly stamp the medallion image on the brown strip. The paper strips were then matted onto brown paper. A further strip of paper was cut using the Fiskars Shapecutter and the small scalloped edge of the Fiskars Circles template. A sentiment from the Hero Arts Birthday Messages set was double stamped on this strip with the Whispers Barn Brown permanent dye ink and the Tim Holtz Spiced Marmalade Distress ink.

Little dots were added along the edges of each of the brown panels and to highlight the dots already on the medallion images.

The second version of the card isn't that dissimilar.

The main differences are that I added the scalloped strip to the vertical brown strip and stamped the medallions on it in the Whispers Barn Brown permanent dye ink.
I added the sentiment to a shorter panel of the scalloped strip, and traced over the lettering with the orange metallic Sakura gel pen.
I also decorated the inside of the cards,
and added my 'Handmade By' medallions to the reverse of the cards.

Blog Widget by LinkWithin